前言 对设计模式的理解,不够透彻,有时去找资料,总是零零散散,不成系统,故将《大话设计模式》中的干货整理下,方便需要使用时可以参考使用。
设计模式六大原则 单一职责原则
定义:就一个类而言,应该仅有一个引起它变化的原因。通俗的说,即一个类只负责一项职责。
解决方案:遵循单一职责原则。分别建立两个类T1、T2,使T1完成职责P1功能,T2完成职责P2功能。这样,当修改类T1时,不会使职责P2发生故障风险;同理,当修改T2时,也不会使职责P1发生故障风险。
最佳实践:
可以降低类的复杂度,一个类只负责一项职责,其逻辑肯定要比负责多项职责简单的多;
提高类的可读性,提高系统的可维护性;
降低需求变更引起的风险。
里氏替换原则
定义:子类型必须能够替换掉它们的父类型。
问题由来:有一功能P1,由类A完成。现需要将功能P1进行扩展,扩展后的功能为P,其中P由原有功能P1与新功能P2组成。新功能P由类A的子类B来完成,则子类B在完成新功能P2的同时,有可能会导致原有功能P1发生故障。
解决方案:当使用继承时,遵循里氏替换原则。类B继承类A时,除添加新的方法完成新增功能P2外,尽量不要重写父类A的方法,也尽量不要重载父类A的方法。
依赖倒转原则
定义:A.高层模块不应该依赖底层模块。两者都应该依赖抽象。B.抽象不应该依赖细节。细节应该依赖抽象。通俗理解:针对接口编程,不要针对实现编程。
问题由来:类A直接依赖类B,假如要将类A改为依赖类C,则必须通过修改类A的代码来达成。这种场景下,类A一般是高层模块,负责复杂的业务逻辑;类B和类C是低层模块,负责基本的原子操作;假如修改类A,会给程序带来不必要的风险。
解决方案:将类A修改为依赖接口I,类B和类C各自实现接口I,类A通过接口I间接与类B或者类C发生联系,则会大大降低修改类A的几率。
最佳实践:
低层模块尽量都要有抽象类或接口,或者抽象类或接口两者都具备。
变量的声明类型尽量是抽象类或接口。
使用继承时遵循里氏替换原则。
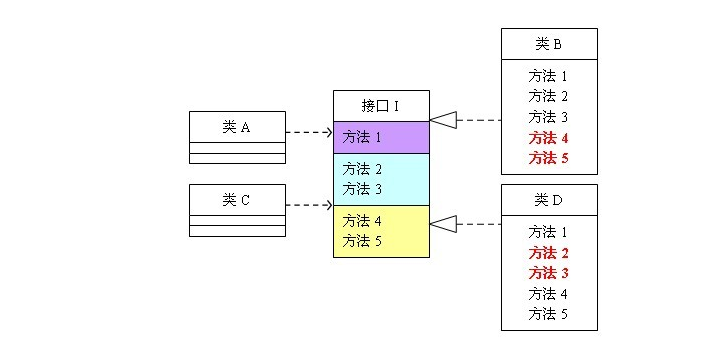
接口隔离原则
定义:一个类对另一个类的依赖,应该建立在最小的接口上。
问题由来:类A通过接口I依赖类B,类C通过接口I依赖类D,如果接口I对于类A和类B来说不是最小接口,则类B和类D必须去实现他们不需要的方法。
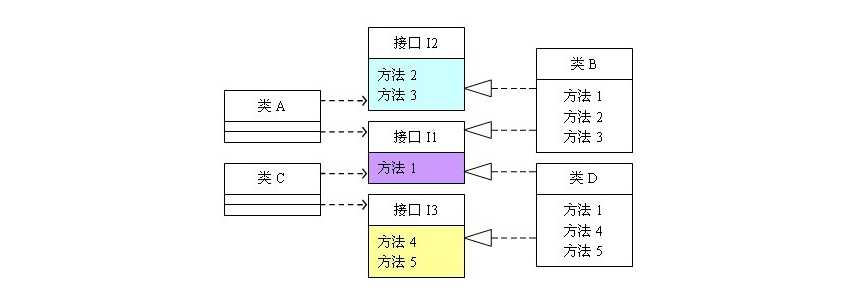
解决方案:将臃肿的接口I拆分为独立的几个接口,类A和类C分别与他们需要的接口建立依赖关系。也就是采用接口隔离原则。
最佳实践:
接口尽量小,但是要有限度。对接口进行细化可以提高程序设计灵活性是不挣的事实,但是如果过小,则会造成接口数量过多,使设计复杂化。所以一定要适度;
为依赖接口的类定制服务,只暴露给调用的类它需要的方法,它不需要的方法则隐藏起来。只有专注地为一个模块提供定制服务,才能建立最小的依赖关系;
提高内聚,减少对外交互。使接口用最少的方法去完成最多的事情;
适度使用,接口设计的过大或过小都不好。
迪米特法则
定义:又叫最少知道原则,如果两个类不必彼此直接通信,那么这两个类就不应当发生直接的相互作用。如果其中一个类需要调用另一个类的某一个方法的话,可以通过第三者转发这个调用。
问题由来:类与类之间的关系越密切,耦合度越大,当一个类发生改变时,对另一个类的影响也越大。
最佳实践:尽量降低类与类之间的耦合。可以通过第三者来进行通信。
开放-封闭原则
定义:软件实体(类、模块、函数等等)应该可以扩展,但是不可修改。
问题由来:在软件的生命周期内,因为变化、升级和维护等原因需要对软件原有代码进行修改时,可能会给旧代码中引入错误,也可能会使我们不得不对整个功能进行重构,并且需要原有代码经过重新测试。
解决方案:当软件需要变化时,尽量通过扩展软件实体的行为来实现变化,而不是通过修改已有的代码来实现变化。
六大原则总结 用抽象构建框架,用实现扩展细节。
单一职责原则告诉我们实现类要职责单一;
里氏替换原则告诉我们不要破坏继承体系;
依赖倒置原则告诉我们要面向接口编程;
接口隔离原则告诉我们在设计接口的时候要精简单一;
迪米特法则告诉我们要降低耦合。
而开闭原则是总纲,它告诉我们要对扩展开放,对修改关闭。
设计模式六大原则
UML基础知识
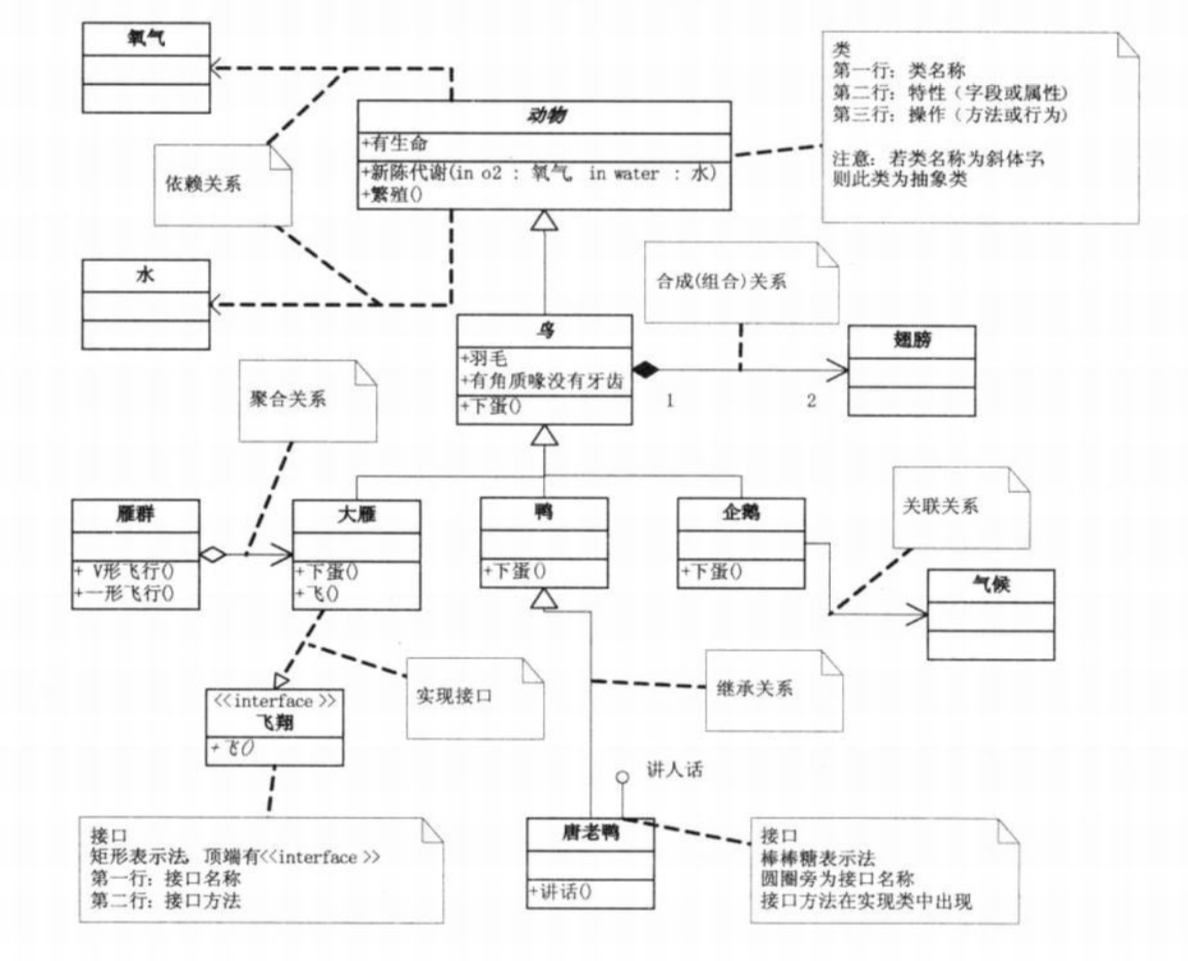
类与类之间的关系
泛化:是一种继承关系,表示一般与特殊的关系,存在于父类与子类、父接口与子接口之间,表示子类如何特
实现:一种类与接口的关系,表示类对接口所有特征和行为的实现,比如大雁与接口飞翔的关系;
组合:是一种强的‘拥有’关系,体现了严格的整体和部分的关系,部分和整体的生命周期一样,比如鸟与翅膀的关系;
聚合:是一种弱的‘拥有’关系,体现的是A对象可以包含B对象,但B对象不是A对象的一部分,比如雁群和大雁的关系;
关联:描述了类与类之间的结构化关系,具有方向、名字、角色和多重性等信息,是一种拥有的关
依赖:是一种使用关系,特定事物的改变有可能会影响到使用该事物的其他事物,表示一个事
各种关系的强弱顺序:
常用的23中设计模式 创建型模式 简单工厂模式 模式动机 考虑一个简单的软件应用场景,一个计算器有不同的按钮(如+、-、*、÷), 这些按钮都源自同一个基类,不过在继承基类后不同的子类修改了部分属性从而使得它们可以完成不同的功能,如果我们希望在使用这些按钮时,不需要知道这些具体按钮类的名字,只需要知道表示该按钮类的一个参数,并提供一个调用方便的方法,把该参数传入方法即可返回一个相应的按钮对象,此时,就可以使用简单工厂模式。
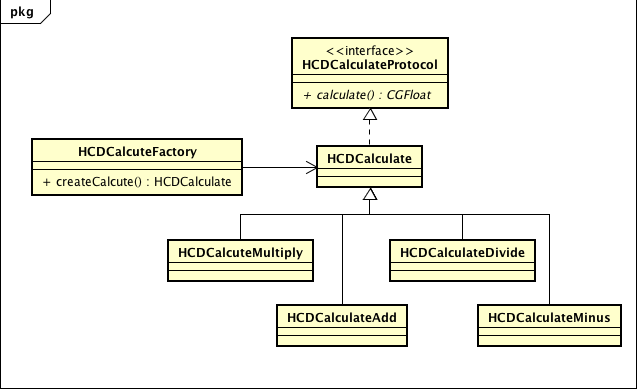
模式定义 简单工厂模式(Simple Factory Pattern):它属于类创建型模式。在简单工厂模式中,可以根据参数的不同返回不同类的实例。简单工厂模式专门定义一个类来负责创建其他类的实例,被创建的实例通常都具有共同的父类。
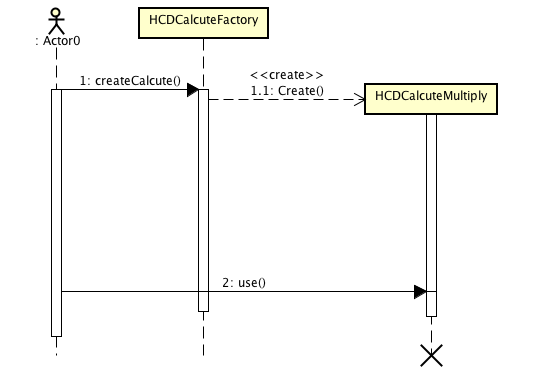
模式结构 简单工厂模式包含如下角色:
HCDCalcuteFactory:工厂角色
HCDCalculate:抽象产品角色
HCDCalculateAdd:具体产品角色
时序图
源码 1 2 3 4 5 6 7 8 9 10 11 12 13 14 15 16 17 #import <Foundation/Foundation.h> #import <UIKit/UIKit.h> typedef NS_ENUM (NSInteger , HCDCalculateType) { HCDCalculateTypeAdd = 0 , HCDCalculateTypeMinus, HCDCalculateTypeMultipy, HCDCalculateTypeDivide }; @protocol HCDCalculateProtocol <NSObject >@optional -(CGFloat )calculate; @end
1 2 3 4 5 6 7 8 9 10 11 #import <Foundation/Foundation.h> #import <UIKit/UIKit.h> #import "HCDCalculateProtocol.h" @interface HCDCalculate : NSObject <HCDCalculateProtocol >@property (nonatomic , assign ) CGFloat numberA;@property (nonatomic , assign ) CGFloat numberB;@end
1 2 3 4 5 6 7 8 9 10 11 12 13 14 15 16 17 18 19 20 21 22 23 24 25 26 27 28 29 30 31 32 33 34 35 36 37 38 39 40 41 42 43 #import <Foundation/Foundation.h> #import "HCDCalculate.h" @interface HCDCalcuteFactory : NSObject +(HCDCalculate *)createCalcute:(NSString *)calculatetype; @end #import "HCDCalcuteFactory.h" #import "HCDCalculateAdd.h" #import "HCDCalculateDivide.h" #import "HCDCalculateMinus.h" #import "HCDCalcuteMultiply.h" @implementation HCDCalcuteFactory +(HCDCalculate *)createCalcute:(NSString *)calculatetype { NSArray *calculateArray = @[@"+" ,@"-" ,@"*" ,@"/" ]; if (![calculateArray containsObject:calculatetype]) { return nil ; } HCDCalculateType calType = [calculateArray indexOfObject:calculatetype]; switch (calType) { case HCDCalculateTypeAdd: return [[HCDCalculateAdd alloc]init]; break ; case HCDCalculateTypeMinus: return [[HCDCalculateMinus alloc]init]; break ; case HCDCalculateTypeMultipy: return [[HCDCalcuteMultiply alloc]init]; case HCDCalculateTypeDivide: return [[HCDCalculateDivide alloc]init]; } } @end
1 2 3 4 5 6 7 8 9 10 11 12 13 14 15 16 17 18 19 20 21 22 23 24 25 26 27 28 29 30 31 32 33 34 35 36 37 38 39 40 41 42 43 44 45 #import "HCDCalculateAdd.h" @implementation HCDCalculateAdd -(CGFloat )calculate{ return self .numberA + self .numberB; } @end #import "HCDCalculateMinus.h" @implementation HCDCalculateMinus -(CGFloat )calculate{ return self .numberA - self .numberB; } @end #import "HCDCalcuteMultiply.h" @implementation HCDCalcuteMultiply -(CGFloat )calculate{ return self .numberA * self .numberB; } @end #import "HCDCalculateDivide.h" @implementation HCDCalculateDivide - (CGFloat )calculate{ if (self .numberB == 0 ) { NSLog (@"dividend is can not be zero!" ); return 0 ; } return self .numberA/self .numberB; } @end
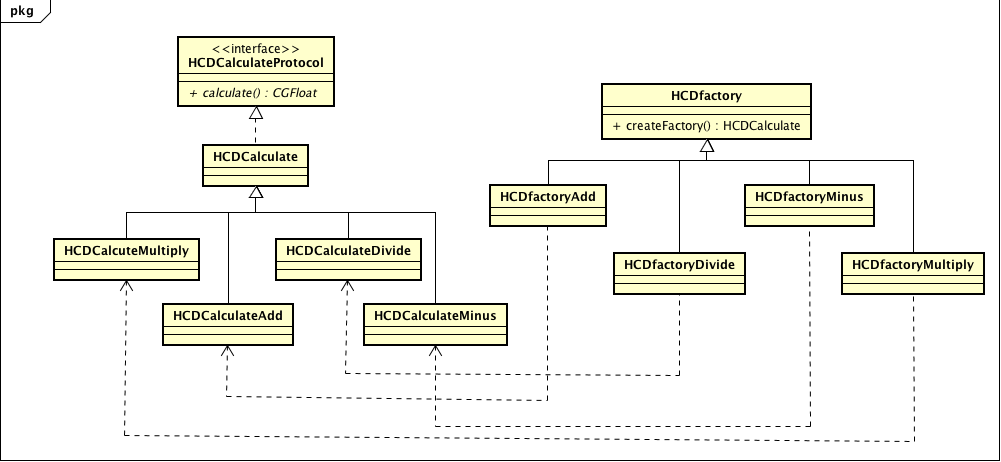
工厂方法模式 模式动机 现在对该系统进行修改,不再设计一个运算工厂类来统一负责所有产品的创建,而是将具体运算的创建过程交给专门的工厂子类去完成,我们先定义一个抽象的运算工厂类,再定义具体的工厂类来生成加法运算、减法运算、乘法运算等,它们实现在抽象按钮工厂类中定义的方法。这种抽象化的结果使这种结构可以在不修改具体工厂类的情况下引进新的产品,如果出现新的按钮类型,只需要为这种新类型的按钮创建一个具体的工厂类就可以获得该新运算的实例,这一特点无疑使得工厂方法模式具有超越简单工厂模式的优越性,更加符合“开闭原则”。
模式定义 工厂方法模式,它属于类创建型模式。在工厂方法模式中,工厂父类负责定义创建产品对象的公共接口,而工厂子类则负责生成具体的产品对象,这样做的目的是将产品类的实例化操作延迟到工厂子类中完成,即通过工厂子类来确定究竟应该实例化哪一个具体产品类。
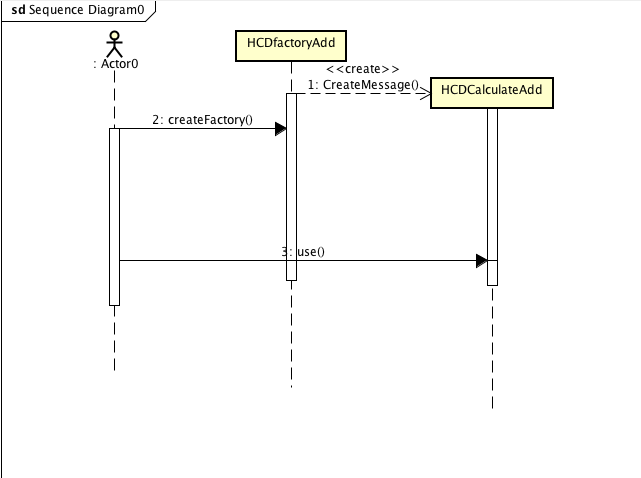
模式结构 工厂方法模式包含如下角色:
HCDCalculate:抽象产品
HCDCalculateAdd:具体产品
HCDfactory:抽象工厂
HCDfactoryAdd:具体工厂
时序图
源码 1 2 3 4 5 6 7 8 9 10 11 12 13 14 15 16 17 18 19 20 21 22 23 24 25 26 27 28 29 30 31 32 33 34 35 36 37 38 39 40 41 42 43 44 45 46 47 48 49 50 51 52 53 #import <Foundation/Foundation.h> #import "HCDCalculate.h" @interface HCDfactory : NSObject -(HCDCalculate *)createFactory; @end #import "HCDfactory.h" @implementation HCDfactory -(HCDCalculate *)createFactory { return nil ; } @end @implementation HCDfactoryAdd -(HCDCalculate *)createFactory { return [[HCDCalculateAdd alloc]init]; } @end @implementation HCDfactoryMinus -(HCDCalculate *)createFactory { return [[HCDCalculateMinus alloc]init]; } @end @implementation HCDfactoryMultiply -(HCDCalculate *)createFactory { return [[HCDCalcuteMultiply alloc]init]; } @end @implementation HCDfactoryDivide -(HCDCalculate *)createFactory { return [[HCDCalculateDivide alloc]init]; } @end
1 2 3 4 5 6 7 8 9 10 11 12 13 14 15 16 17 18 19 20 21 22 23 24 25 26 27 28 29 30 31 32 33 34 35 36 37 38 39 40 41 42 43 44 45 46 47 48 49 50 51 52 53 54 55 56 57 58 59 60 @interface HCDCalculate : NSObject <HCDCalculateProtocol >@property (nonatomic , assign ) CGFloat numberA;@property (nonatomic , assign ) CGFloat numberB;@end @implementation HCDCalculateAdd -(CGFloat )calculate{ return self .numberA + self .numberB; } @end @implementation HCDCalculateMinus -(CGFloat )calculate{ return self .numberA - self .numberB; } @end @implementation HCDCalcuteMultiply -(CGFloat )calculate{ return self .numberA * self .numberB; } @end @implementation HCDCalculateDivide - (CGFloat )calculate{ if (self .numberB == 0 ) { NSLog (@"dividend is can not be zero!" ); return 0 ; } return self .numberA/self .numberB; } @end typedef NS_ENUM (NSInteger , HCDCalculateType) { HCDCalculateTypeAdd = 0 , HCDCalculateTypeMinus, HCDCalculateTypeMultipy, HCDCalculateTypeDivide }; @protocol HCDCalculateProtocol <NSObject >@optional -(CGFloat )calculate; @end
1 2 3 4 5 6 7 8 9 10 11 12 13 14 15 16 17 18 19 20 21 22 23 24 25 HCDfactory *addFactory = [[HCDfactoryAdd alloc]init]; HCDCalculate *addCalculate = [addFactory createFactory]; addCalculate.numberA = 10 ; addCalculate.numberB = 15 ; NSLog (@"结果是%f\n" ,[addCalculate calculate]); HCDfactory *minusFactory = [[HCDfactoryMinus alloc]init]; HCDCalculate *minusCalculate = [minusFactory createFactory]; minusCalculate.numberA = 10 ; minusCalculate.numberB = 15 ; NSLog (@"结果是%f\n" ,[minusCalculate calculate]); HCDfactory *multiplyFactory = [[HCDfactoryMultiply alloc]init]; HCDCalculate *multiplyCalculate = [multiplyFactory createFactory]; multiplyCalculate.numberA = 10 ; multiplyCalculate.numberB = 15 ; NSLog (@"结果是%f\n" ,[multiplyCalculate calculate]); HCDfactory *divideFactory = [[HCDfactoryDivide alloc]init]; HCDCalculate *divideCalculate = [divideFactory createFactory]; divideCalculate.numberA = 10 ; divideCalculate.numberB = 15 ; NSLog (@"结果是%f\n" ,[divideCalculate calculate]);
抽象工厂模式 模式动机
在工厂方法模式中具体工厂负责生产具体的产品,每一个具体工厂对应一种具体产品,工厂方法也具有唯一性,一般情况下,一个具体工厂中只有一个工厂-方法或者一组重载的工厂方法。但是有时候我们需要一个工厂可以提供多个产品对象,而不是单一的产品对象。
当系统所提供的工厂所需生产的具体产品并不是一个简单的对象,而是多个位于不同产品等级结构中属于不同类型的具体产品时需要使用抽象工厂模式。
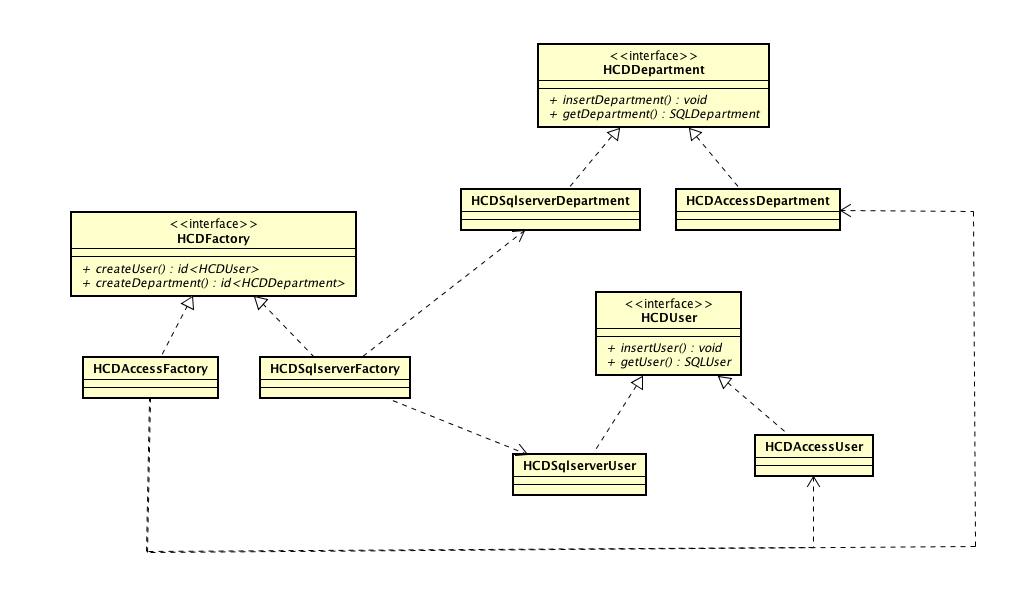
模式定义 抽象工厂模式:提供一个创建一系列相关或相互依赖对象的接口,而无须指定它们具体的类。属于对象创建型模式。
模式结构 抽象工厂模式包含如下角色:
HCDFactory:抽象工厂
HCDSqlserverFactory:具体工厂
HCDDepartment:抽象产品
HCDSqlserverDepartment:具体产品
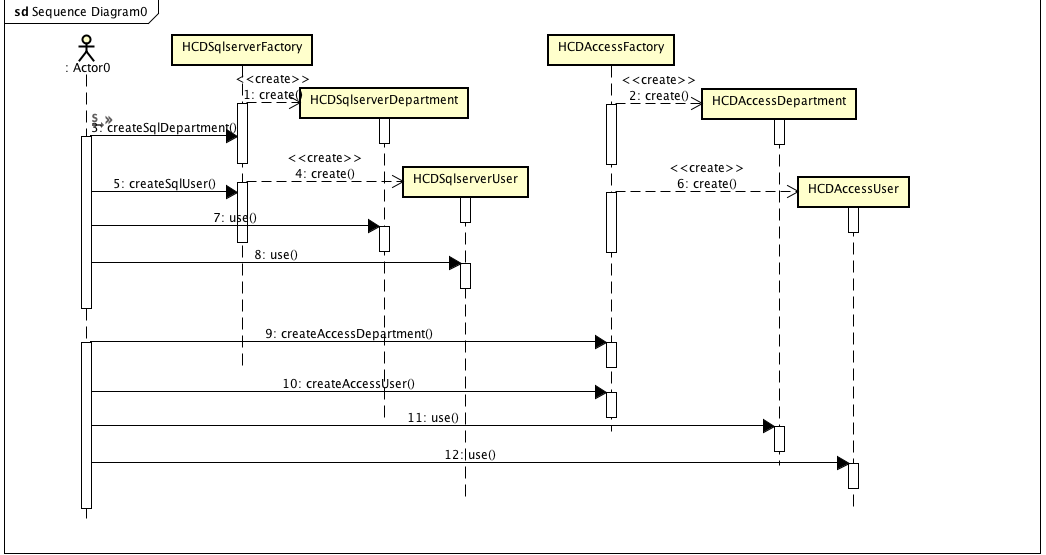
时序图
源码 1 2 3 4 5 6 7 8 9 10 11 12 13 14 15 16 17 18 19 20 21 22 23 24 25 26 27 28 29 30 31 @protocol HCDFactory <NSObject >-(id <HCDUser>)createUser; -(id <HCDDepartment>)createDepartment; @end @implementation HCDSqlserverFactory -(id <HCDUser>)createUser{ return [[HCDSqlserverUser alloc]init]; } -(id <HCDDepartment>)createDepartment{ return [[HCDSqlserverDepartment alloc]init]; } @end -(id <HCDUser>)createUser{ return [[HCDAccessUser alloc]init]; } -(id <HCDDepartment>)createDepartment{ return [[HCDAccessDepartment alloc]init]; } @end
1 2 3 4 5 6 7 8 9 10 11 12 13 14 15 16 17 18 19 20 21 22 23 24 25 26 27 28 29 30 31 32 33 34 35 36 @protocol HCDDepartment <NSObject >-(void )insertDepartment:(SQLDepartment *)department; -(SQLDepartment *)getDepartment; @end @implementation HCDSqlserverDepartment -(SQLDepartment *)getDepartment{ NSLog (@"新建一个Sqlserver的SQLDepartment对象" ); return [[SQLDepartment alloc]init]; } -(void )insertDepartment:(SQLDepartment *)department{ NSLog (@"插入一个Sqlserver的SQLDepartment对象" ); } @end @implementation HCDAccessDepartment -(SQLDepartment *)getDepartment{ NSLog (@"新建一个Access的SQLDepartment对象" ); return [[SQLDepartment alloc]init]; } -(void )insertDepartment:(SQLDepartment *)department{ NSLog (@"插入一个Access的SQLDepartment对象" ); } @end
1 2 3 4 5 6 7 8 9 10 11 12 13 14 15 16 17 18 19 20 21 22 23 24 25 26 27 28 29 30 31 32 33 34 35 36 @protocol HCDUser <NSObject >-(void )insertUser:(SQLUser *)user; -(SQLUser *)getUser; @end @implementation HCDSqlserverUser -(SQLUser *)getUser{ NSLog (@"新建一个Sqlserver的SQLUser对象" ); return [[SQLUser alloc]init]; } -(void )insertUser:(SQLUser *)user{ NSLog (@"插入一个Sqlserver的SQLUser对象" ); } @end @implementation HCDAccessUser -(SQLUser *)getUser{ NSLog (@"新建一个Access的SQLUser对象" ); return [[SQLUser alloc]init]; } -(void )insertUser:(SQLUser *)user{ NSLog (@"插入一个Access的SQLUser对象" ); } @end
1 2 3 4 5 6 7 8 9 10 11 12 13 14 15 16 17 18 id <HCDFactory> factory0 = [[HCDSqlserverFactory alloc]init]; id <HCDDepartment> department0 = [factory0 createDepartment]; [department0 insertDepartment:[[SQLDepartment alloc]init]]; [department0 getDepartment]; id <HCDUser> user0 = [factory0 createUser]; [user0 insertUser:[[SQLUser alloc] init]]; [user0 getUser]; id <HCDFactory> factory1 = [[HCDAccessFactory alloc]init]; id <HCDDepartment> department1 = [factory1 createDepartment]; [department1 insertDepartment:[[SQLDepartment alloc]init]]; [department1 getDepartment]; id <HCDUser> user1 = [factory1 createUser]; [user1 insertUser:[[SQLUser alloc] init]]; [user1 getUser];
建造者模式 模式动机 无论是在现实世界中还是在软件系统中,都存在一些复杂的对象,它们拥有多个组成部分,如汽车,它包括车轮、方向盘、发送机等各种部件。而对于大多数用户而言,无须知道这些部件的装配细节,也几乎不会使用单独某个部件,而是使用一辆完整的汽车,可以通过建造者模式对其进行设计与描述,建造者模式可以将部件和其组装过程分开,一步一步创建一个复杂的对象。用户只需要指定复杂对象的类型就可以得到该对象,而无须知道其内部的具体构造细节。
模式定义 造者模式:将一个复杂对象的构建与它的表示分离,使得同样的构建过程可以创建不同的表示。
模式结构 建造者模式包含如下角色:
HCDPresionBuilder:抽象建造者
HCDPersonFatBuilder:具体建造者
HCDPersonBuilderDirector:指挥者
HCDProduct:产品角色
时序图
源码 1 2 3 4 5 6 7 8 9 10 11 12 13 14 15 16 17 18 19 20 21 22 23 24 25 26 27 28 29 30 31 32 33 34 35 36 37 38 @class HCDPresionBuilder ;@interface HCDPersonBuilderDirector : NSObject - (instancetype )initWithBuilder:(HCDPresionBuilder *)builder; - (void )buildPerson; @end @interface HCDPersonBuilderDirector ()@property (nonatomic , strong ) HCDPresionBuilder *builder;@end @implementation HCDPersonBuilderDirector - (instancetype )initWithBuilder:(HCDPresionBuilder *)builder { self = [super init]; if (self ) { self .builder = builder; } return self ; } - (void )buildPerson { [self .builder buildHead]; [self .builder buildBody]; [self .builder buildArmLeft]; [self .builder buildArmRight]; [self .builder buildLegLeft]; [self .builder buildLegRight]; [self .builder getResult]; } @end
1 2 3 4 5 6 7 8 9 10 11 12 13 14 15 16 17 18 19 20 21 22 23 24 25 26 27 28 29 30 31 32 33 34 35 36 37 38 39 40 41 42 43 44 45 46 47 48 49 50 51 52 53 54 55 56 57 58 59 60 61 62 63 64 65 66 67 68 69 70 71 72 73 74 75 76 77 78 79 80 81 82 83 84 85 86 87 88 89 90 91 92 93 94 95 96 97 98 99 100 101 102 103 104 105 106 107 108 109 110 111 112 113 114 115 116 117 118 119 120 121 122 123 124 125 126 127 128 129 ypedef NS_ENUM (NSUInteger ,HCDBuildOption){ HCDBuildOptionFat = 0 , HCDBuildOptionThin }; @protocol HCDPresionBuilderProtocol <NSObject >- (void )buildHead; - (void )buildBody; - (void )buildArmLeft; - (void )buildArmRight; - (void )buildLegLeft; - (void )buildLegRight; - (HCDProduct *)getResult; @end @interface HCDPresionBuilder : NSObject <HCDPresionBuilderProtocol >@end @interface HCDPersonFatBuilder ()@property (nonatomic , strong ) HCDProduct *product;@end @implementation HCDPersonFatBuilder -(instancetype )init{ self = [super init]; if (self ) { _product = [[HCDProduct alloc] init]; } return self ; } - (void )buildHead { NSLog (@"建造胖子的头部" ); [self .product.header work]; } - (void )buildBody { NSLog (@"建造胖子的身体" ); [self .product.body work]; } - (void )buildArmLeft { NSLog (@"建造胖子的左手" ); [self .product.arm work]; } - (void )buildArmRight { NSLog (@"建造胖子的右手" ); [self .product.arm work]; } - (void )buildLegLeft { NSLog (@"建造胖子的左脚" ); [self .product.leg work]; } - (void )buildLegRight { NSLog (@"建造胖子的右脚" ); [self .product.leg work]; } - (HCDProduct *)getResult { return self .product; } @end @interface HCDPersonThinBuilder ()@property (nonatomic , strong ) HCDProduct *product;@end @implementation HCDPersonThinBuilder -(instancetype )init{ self = [super init]; if (self ) { _product = [[HCDProduct alloc] init]; } return self ; } - (void )buildHead { NSLog (@"建造瘦子的头部" ); [self .product.header work]; } - (void )buildBody { NSLog (@"建造瘦子的身体" ); [self .product.body work]; } - (void )buildArmLeft { NSLog (@"建造瘦子的左手" ); [self .product.arm work]; } - (void )buildArmRight { NSLog (@"建造瘦子的右手" ); [self .product.arm work]; } - (void )buildLegLeft { NSLog (@"建造瘦子的左脚" ); [self .product.leg work]; } - (void )buildLegRight { NSLog (@"建造瘦子的右脚" ); [self .product.leg work]; } - (HCDProduct *)getResult { return self .product; } @end
1 2 3 4 5 6 7 8 9 10 11 12 - (IBAction )buildFat:(id )sender { HCDPersonFatBuilder *builder = [[HCDPersonFatBuilder alloc]init]; HCDPersonBuilderDirector *director = [[HCDPersonBuilderDirector alloc] initWithBuilder:builder]; [director buildPerson]; } - (IBAction )buildThin:(id )sender { HCDPersonThinBuilder *builder = [[HCDPersonThinBuilder alloc]init]; HCDPersonBuilderDirector *director = [[HCDPersonBuilderDirector alloc] initWithBuilder:builder]; [director buildPerson]; }
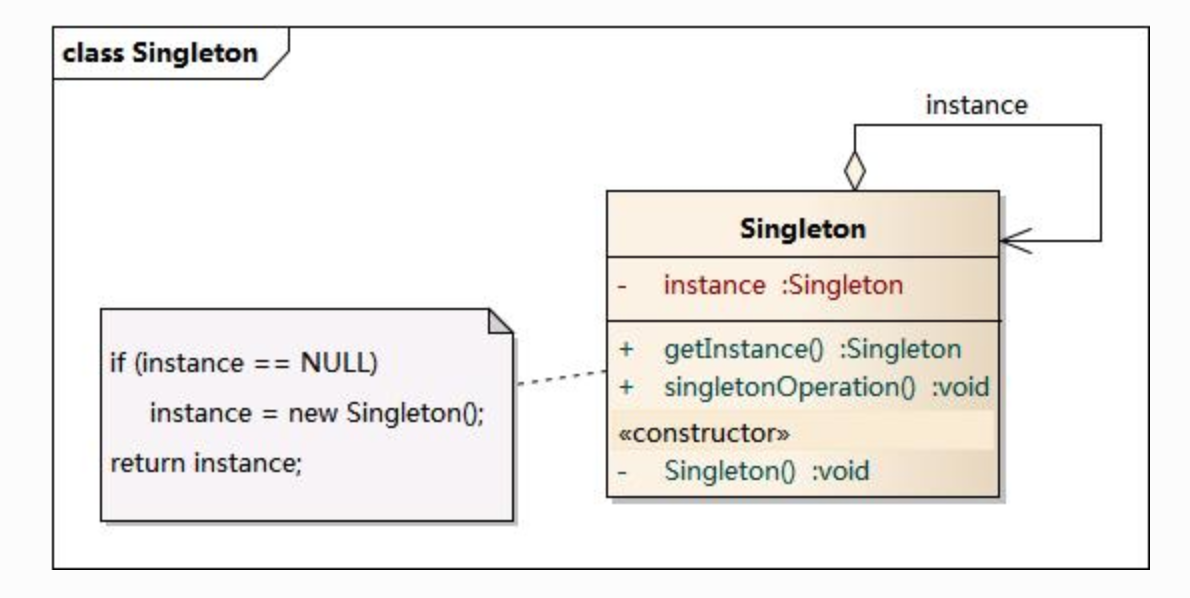
单例模式 模式动机 对于系统中的某些类来说,只有一个实例很重要,例如,一个系统中可以存在多个打印任务,但是只能有一个正在工作的任务;一个系统只能有一个窗口管理器或文件系统;一个系统只能有一个计时工具或ID(序号)生成器。
模式定义 单例模式:单例模式确保某一个类只有一个实例,而且自行实例化并向整个系统提供这个实例,这个类称为单例类,它提供全局访问的方法。
模式结构
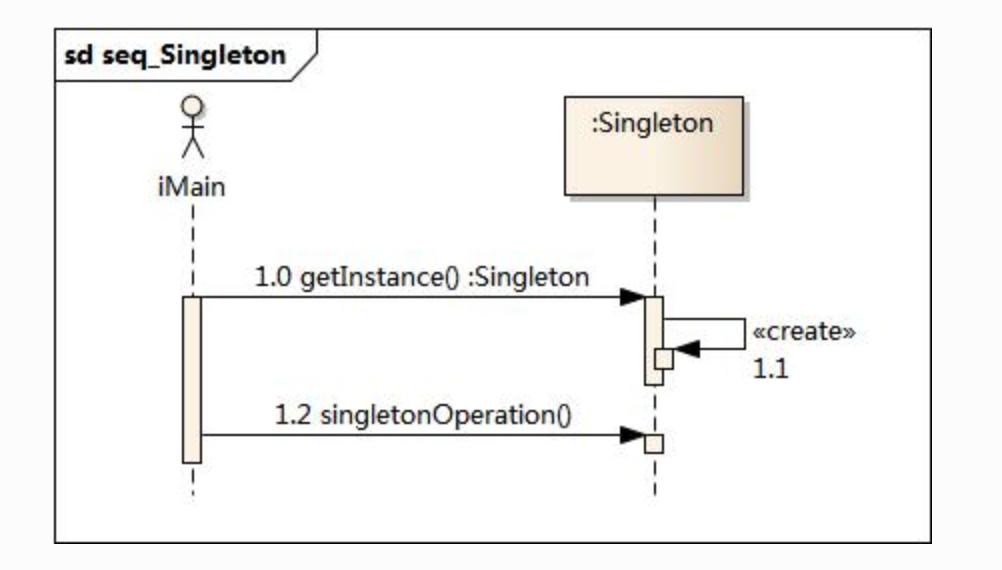
时序图
源码 1 2 3 4 5 6 7 8 +(instancetype )sharedInstance{ static HCDSingleton *singleton = nil ; static dispatch_once_t onceToken; dispatch_once (&onceToken, ^{ singleton = [[HCDSingleton alloc]init]; }); return singleton; }
原型模式 模式动机
将一个原型对象传给那个要发动创建的对象,这个要发动创建的对象通过请求原型对象拷贝自己来实现创建过程。
通过克隆方法所创建的对象是全新的对象,它们在内存中拥有新的地址,通常对克隆所产生的对象进行修改对原型对象不会造成任何影响,每一个克隆对象都是相互独立的。通过不同的方式修改可以得到一系列相似但不完全相同的对象。
模式定义 使用原型实例指定创建对象的种类,并且通过拷贝这些原型创建新的对象。原型模式是一种对象创建型模式。
浅复制:被复制对象的所有变量都含有与原来的对象相同的值,而所有的对其他对象的引用都仍然指向原来的对象;
深复制:把引用对象的变量指向复制过的新对象,而不是原有的被引用的对象。
iOS深拷贝和浅拷贝
结构式模式 组合模式 模式动机
对于树形结构,当容器对象的某一个方法被调用时,将遍历整个树形结构,寻找也包含这个方法的成员对象(可以是容器对象,也可以是叶子对象,如子文件夹和文件)并调用执行。(递归调用)
由于容器对象和叶子对象在功能上的区别,在使用这些对象的客户端代码中必须有区别地对待容器对象和叶子对象,而实际上大多数情况下客户端希望一致地处理它们,因为对于这些对象的区别对待将会使得程序非常复杂。
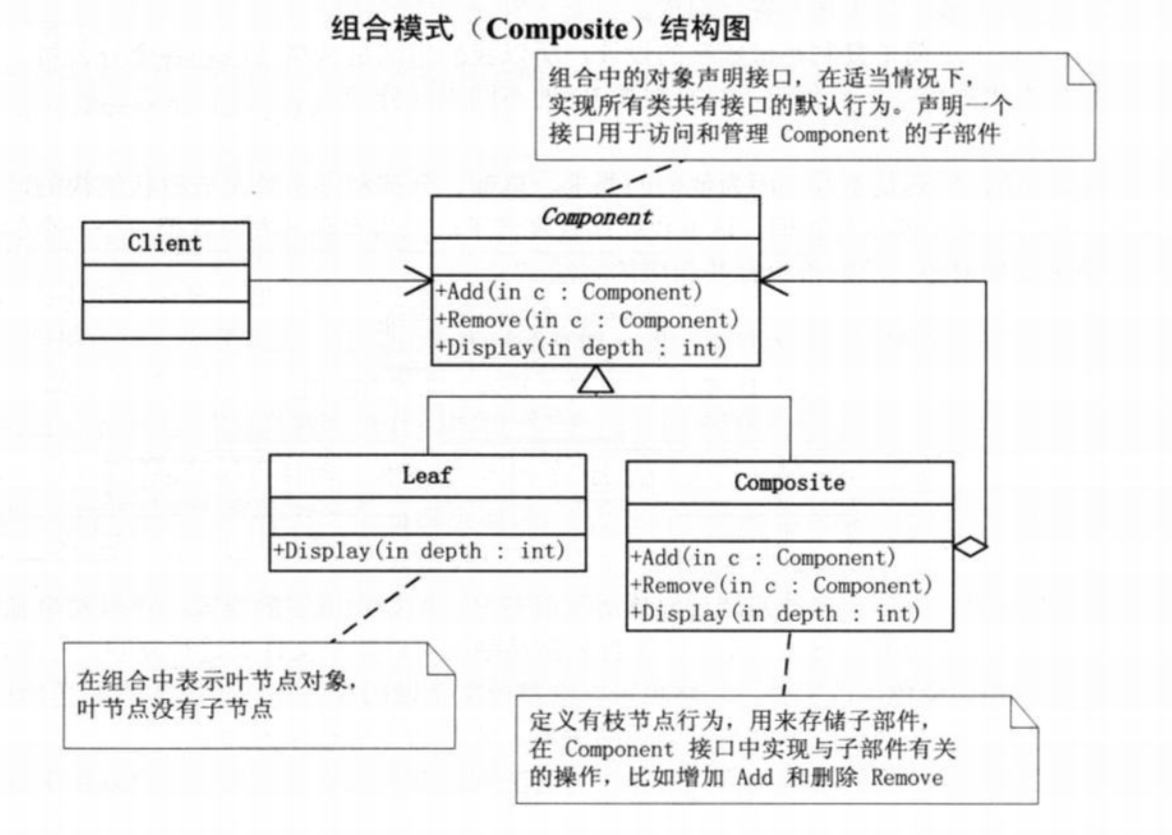
模式定义 将对象组合成树形结构以表示‘部分-整体’的层次结构。组合模式使得用户对单个对象和组合对象的使用具有一致性。
模式结构 模板方法模式包含如下角色:
Component: 对象声明接口
Leaf: 叶节点对象
Composite: 枝节点行为
时序图 略
源码 1 2 3 4 5 6 7 8 9 10 11 12 13 14 15 16 17 18 19 20 HCDConcreteCompany *root = [[HCDConcreteCompany alloc] initWithName:@"总公司" ]; [root add:[[HCDHRDepartment alloc] initWithName:@"总公司人力资源部" ]]; [root add:[[HCDFinanceDepartment alloc] initWithName:@"总公司财务部" ]]; HCDConcreteCompany *comp = [[HCDConcreteCompany alloc] initWithName:@"上海华东分公司" ]; [comp add:[[HCDHRDepartment alloc] initWithName:@"上海华东分公司人力资源部" ]]; [comp add:[[HCDFinanceDepartment alloc] initWithName:@"上海华东分公司财务部" ]]; [root add:comp]; HCDConcreteCompany *office = [[HCDConcreteCompany alloc] initWithName:@"杭州办事处" ]; [office add:[[HCDHRDepartment alloc] initWithName:@"杭州办事处人力资源部" ]]; [office add:[[HCDFinanceDepartment alloc] initWithName:@"杭州办事处财务部" ]]; NSLog (@"\n" );[comp add:office]; NSLog (@"结构图:--------------------------" );[root display:1 ]; NSLog (@"\n" );NSLog (@"职责:---------------------------" );[root lineofDuty];
1 2 3 4 5 6 7 8 9 10 11 12 13 14 15 16 @interface HCDCompany : NSObject @property (nonatomic ,copy ) NSString *name;- (instancetype )initWithName:(NSString *)name; -(void )add:(HCDCompany *)company; -(void )remove:(HCDCompany *)company; -(void )display:(NSInteger )depth; -(void )lineofDuty; @end
1 2 3 4 5 6 7 8 9 10 11 12 13 14 15 16 17 18 19 20 21 22 23 24 25 26 27 28 29 30 31 32 33 34 35 36 37 38 39 40 41 42 43 44 45 46 47 48 49 @interface HCDConcreteCompany : HCDCompany @end @interface HCDConcreteCompany ()@property (nonatomic , strong ) NSMutableArray *childList;@end @implementation HCDConcreteCompany - (instancetype )initWithName:(NSString *)name{ self = [super initWithName:name]; if (self ) { _childList = [NSMutableArray array]; } return self ; } - (void )add:(HCDCompany *)company{ [self .childList addObject:company]; } - (void )remove:(HCDCompany *)company{ [self .childList removeObject:company]; } - (void )display:(NSInteger )depth { NSString *seperate = @"" ; for (NSInteger i = 0 ; i < depth; i++) { seperate = [seperate stringByAppendingString:@"-" ]; } NSLog (@"%@%@的子公司" ,seperate,self .name); for (HCDCompany * company in self .childList) { [company display:depth + 2 ]; } } - (void )lineofDuty{ NSLog (@"%@的子公司的职责" ,self .name); for (HCDCompany * company in self .childList) { [company lineofDuty]; } } @end
1 2 3 4 5 6 7 8 9 10 11 12 13 14 15 16 17 18 19 20 21 22 23 24 25 26 27 28 29 @interface HCDHRDepartment : HCDCompany @end @implementation HCDHRDepartment -(void )add:(HCDCompany *)company{ } - (void )display:(NSInteger )depth { NSString *seperate = @"" ; for (NSInteger i = 0 ; i < depth; i++) { seperate = [seperate stringByAppendingString:@"-" ]; } NSLog (@"%@%@的HR部门" ,seperate,self .name); } -(void )remove:(HCDCompany *)company{ } -(void )lineofDuty{ NSLog (@"%@,培训员工" ,self .name); } @end
1 2 3 4 5 6 7 8 9 10 11 12 13 14 15 16 17 18 19 20 21 22 23 24 25 26 27 28 29 @interface HCDFinanceDepartment : HCDCompany @end @implementation HCDFinanceDepartment -(void )add:(HCDCompany *)company{ } -(void )remove:(HCDCompany *)company{ } - (void )display:(NSInteger )depth { NSString *seperate = @"" ; for (NSInteger i = 0 ; i < depth; i++) { seperate = [seperate stringByAppendingString:@"-" ]; } NSLog (@"%@%@的财务部门" ,seperate,self .name); } -(void )lineofDuty{ NSLog (@"%@,给员工发钱" ,self .name); } @end
适配器模式 模式动机 适配器提供客户类需要的接口,适配器的实现就是把客户类的请求转化为对适配者的相应接口的调用。也就是说:当客户类调用适配器的方法时,在适配器类的内部将调用适配者类的方法,而这个过程对客户类是透明的,客户类并不直接访问适配者类。因此,适配器可以使由于接口不兼容而不能交互的类可以一起工作。这就是适配器模式的模式动机。
模式定义 适配器模式:将一个接口转换成客户希望的另一个接口,适配器模式使接口不兼容的那些类可以一起工作,其别名为包装器。适配器模式既可以作为类结构型模式,也可以作为对象结构型模式。
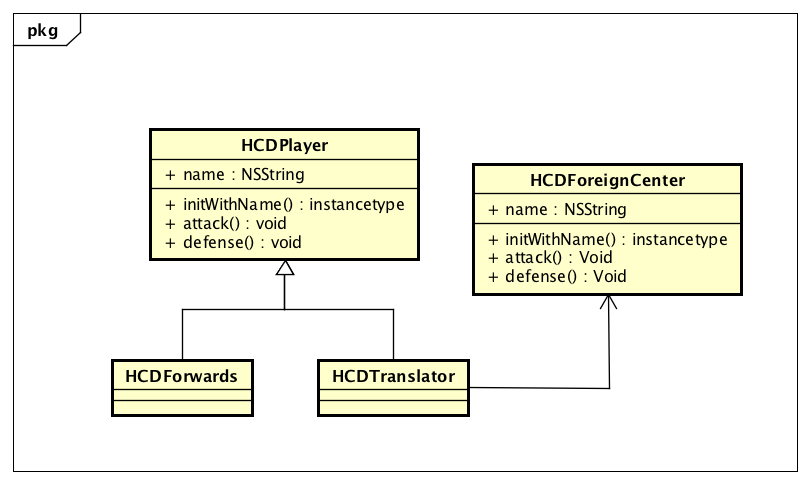
模式结构 适配器模式包含如下角色:
HCDPlayer:目标抽象类
HCDTranslator:适配器类
HCDForeignCenter:适配者类
时序图
源码 1 2 3 4 5 6 7 8 9 HCDPlayer *forward = [[HCDForwards alloc] initWithName:@"maidi" ]; [forward attack]; [forward defense]; HCDForeignCenter *foreignCenter = [[HCDForeignCenter alloc] initWithName:@"姚明" ]; HCDPlayer *translator = [[HCDTranslator alloc] initWithForeigncenter:foreignCenter]; [translator attack]; [translator defense];
1 2 3 4 5 6 7 8 9 10 11 12 13 14 15 16 17 18 19 20 21 22 23 24 25 26 27 28 29 30 31 32 33 34 35 36 37 38 39 40 41 42 43 44 45 46 47 48 49 50 51 52 @interface HCDPlayer : NSObject @property (nonatomic ,copy ) NSString *name;-(void )attack; -(void )defense; -(instancetype )initWithName:(NSString *)name; @end @implementation HCDForwards -(void )attack{ NSLog (@"前锋%@进攻" ,self .name); } -(void )defense{ NSLog (@"前锋%@防守" ,self .name); } @end @interface HCDTranslator ()@property (nonatomic , strong ) HCDForeignCenter *foreigncenter;@end @implementation HCDTranslator -(instancetype )initWithForeigncenter:(HCDForeignCenter *)foreigncenter { self = [super init]; if (self ) { _foreigncenter = foreigncenter; } return self ; } -(void )defense{ [self .foreigncenter foreignDefent]; } -(void )attack{ [self .foreigncenter foreignAttact]; } @end
1 2 3 4 5 6 7 8 9 10 11 12 13 14 15 16 17 18 19 20 @implementation HCDForeignCenter - (instancetype )initWithName:(NSString *)name{ self = [super init]; if (self ) { _name = name; } return self ; } - (void )foreignAttact{ NSLog (@"外籍中锋%@进攻" ,self .name); } - (void )foreignDefent{ NSLog (@"外籍中锋%@防守" ,self .name); } @end
桥接模式 模式动机 如果需要开发一个跨平台视频播放器,可以在不同操作系统平台(如Windows、Linux、Unix等)上播放多种格式的视频文件,常见的视频格式包括MPEG、RMVB、AVI、WMV等。现使用桥接模式设计该播放器。此时至少有如下两种设计方案:
第一种设计方案是为每一种操作系统都提供一套支持各种视频格式的版本;
第二种设计方案是根据实际需要对操作系统和支持的视频格式进行组合。
对于有两个变化维度(即两个变化的原因)的系统,采用方案二来进行设计系统中类的个数更少,且系统扩展更为方便。设计方案二即是桥接模式的应用。桥接模式将继承关系转换为关联关系,从而降低了类与类之间的耦合,减少了代码编写量。
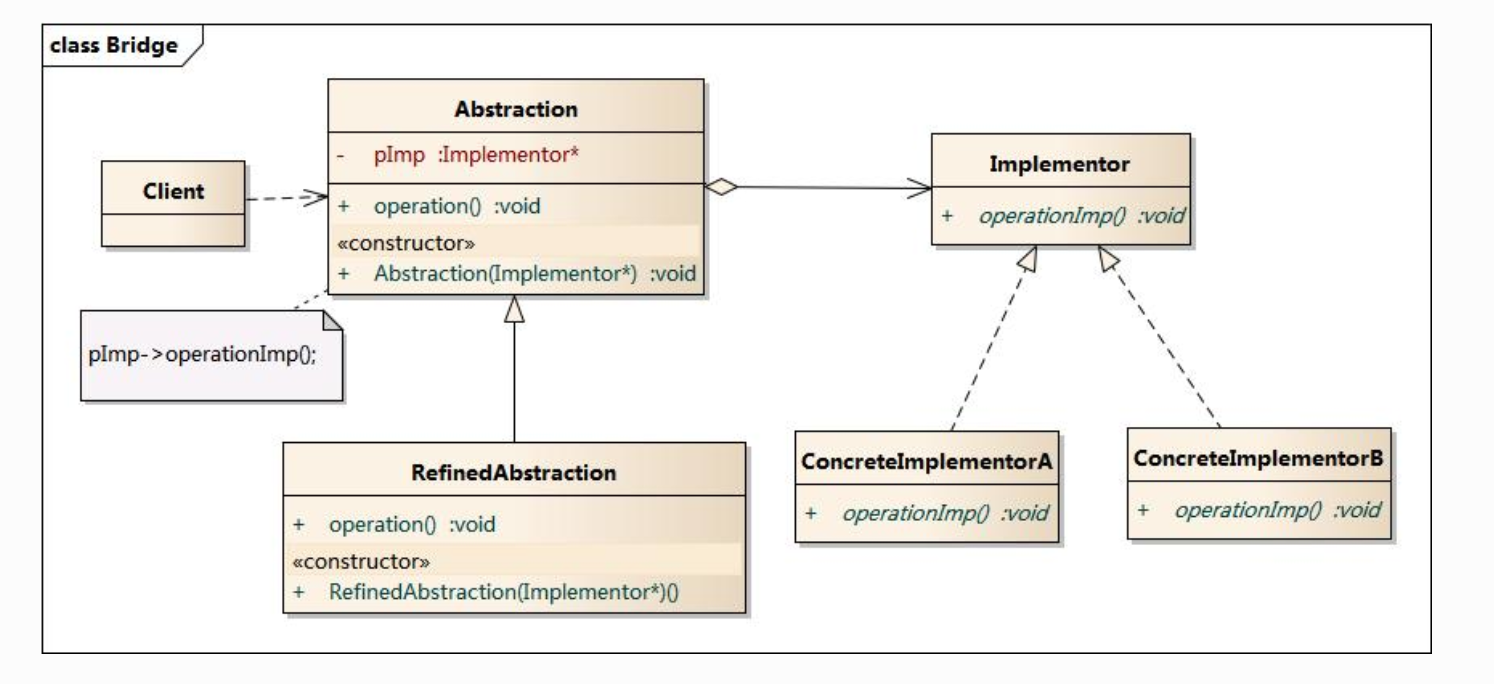
模式定义 桥接模式:将抽象部分与它的实现部分分离,使它们都可以独立地变化。它是一种对象结构型模式。
模式结构 桥接模式包含如下角色:
Abstraction:抽象类
RefinedAbstraction:扩充抽象类
Implementor:实现类接口
ConcreteImplementor:具体实现类
时序图
源码 略
装饰模式 模式动机 一般有两种方式可以实现给一个类或对象增加行为:
继承机制,使用继承机制是给现有类添加功能的一种有效途径,通过继承一个现有类可以使得子类在拥有自身方法的同时还拥有父类的方法。但是这种方法是静态的,用户不能控制增加行为的方式和时机;
关联机制,即将一个类的对象嵌入另一个对象中,由另一个对象来决定是否调用嵌入对象的行为以便扩展自己的行为,我们称这个嵌入的对象为装饰器(Decorator)。
装饰模式以对客户透明的方式动态地给一个对象附加上更多的责任。装饰模式可以在不需要创造更多子类的情况下,将对象的功能加以扩展。这就是装饰模式的模式动机。
模式定义 装饰模式(Decorator Pattern) :动态地给一个对象增加一些额外的职责,就增加对象功能来说,装饰模式比生成子类实现更为灵活。它是一种对象结构型模式。
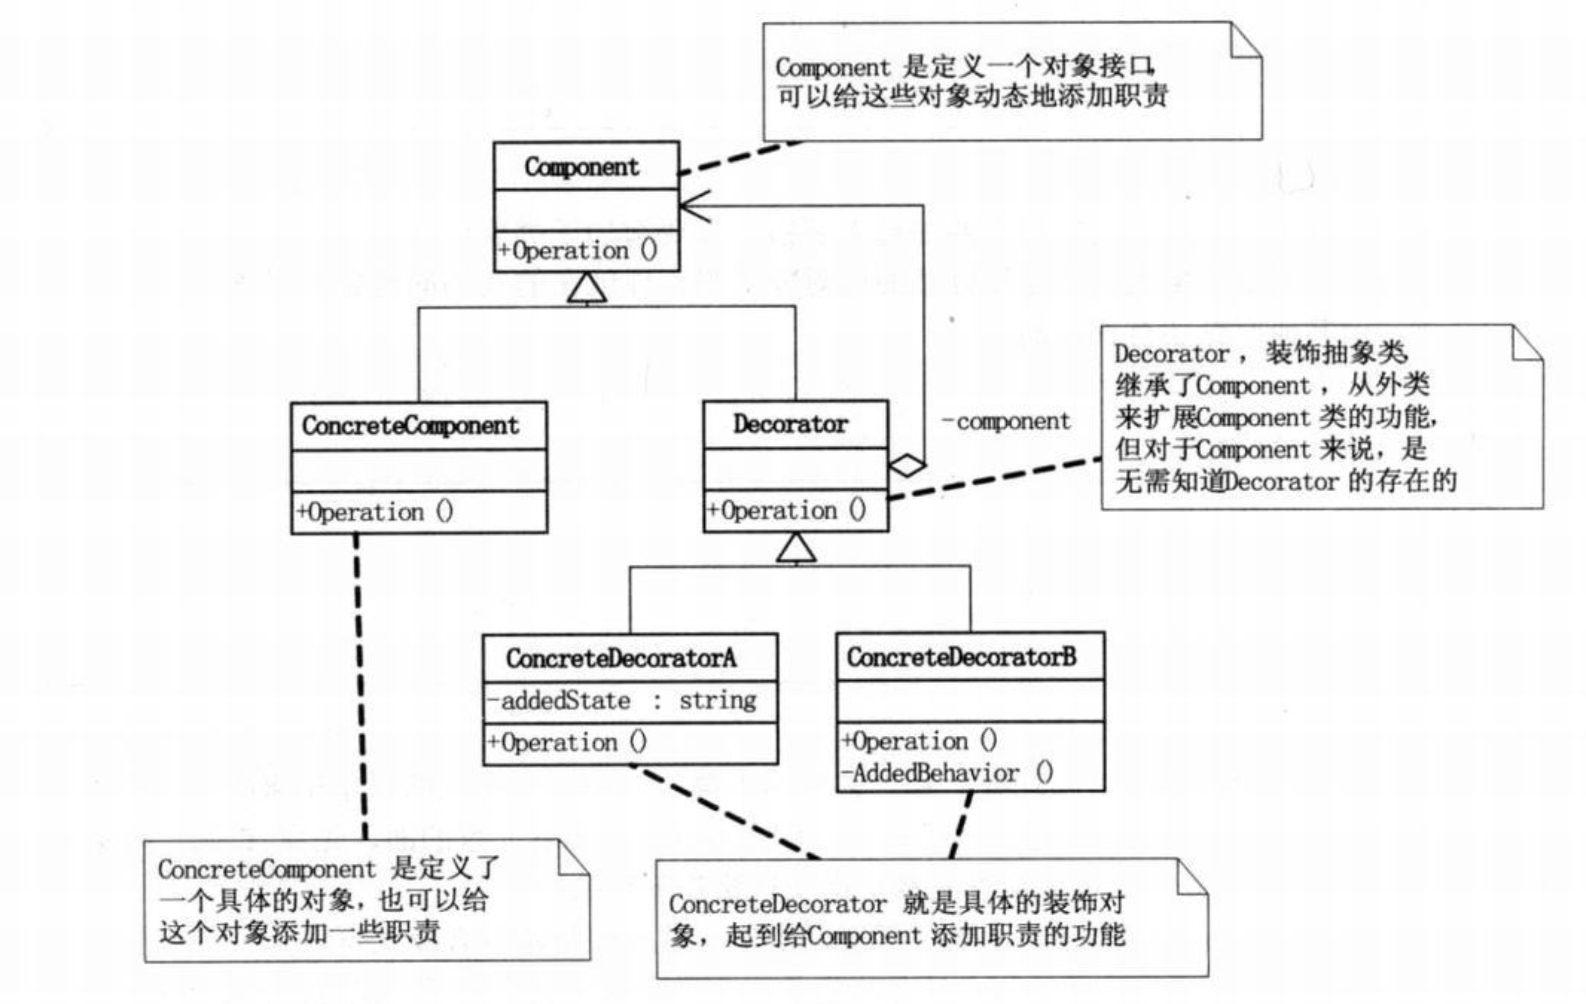
模式结构 装饰模式包含如下角色:
Component: 抽象构件
ConcreteComponent: 具体构件
Decorator: 抽象装饰类
ConcreteDecorator: 具体装饰类
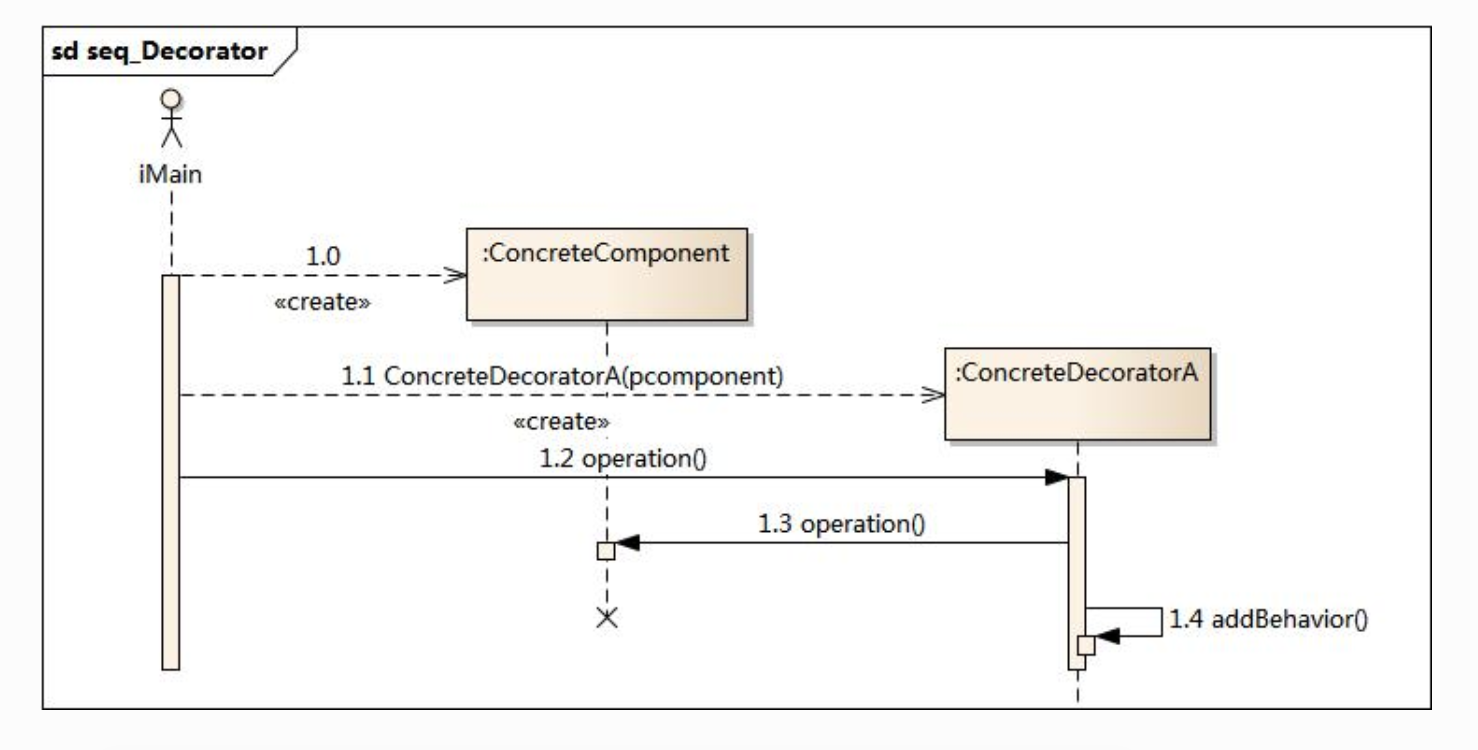
时序图
源码 1 2 3 4 5 6 7 8 9 10 11 12 13 14 15 16 17 18 19 20 21 22 LTPerson *xc = [[LTPerson alloc] initWithName:@"小菜" ]; NSLog (@"\n第一种装扮" ); LTSneakers *sneaker = [[LTSneakers alloc] init]; LTBigTrouser *bigTrouser = [[LTBigTrouser alloc] init]; LTTshirts *tshirts = [[LTTshirts alloc] init]; [sneaker decorate:xc]; [bigTrouser decorate:sneaker]; [tshirts decorate:bigTrouser]; [tshirts show]; NSLog (@"\n第二种装扮" ); LTLeatherShoes *leatherShoes = [[LTLeatherShoes alloc] init]; LTTie *tie = [[LTTie alloc] init]; LTSuit *suit = [[LTSuit alloc] init]; [leatherShoes decorate:xc]; [tie decorate:leatherShoes]; [suit decorate:tie]; [suit show];
1 2 3 4 5 6 7 8 9 10 11 12 13 14 15 16 17 18 19 20 21 22 23 24 25 26 27 28 29 30 31 @interface LTPerson : NSObject - (instancetype )initWithName:(NSString *)name; - (void )show; @end @interface LTPerson ()@property (nonatomic , copy ) NSString *name;@end @implementation LTPerson - (instancetype )initWithName:(NSString *)name { self = [super init]; if (self ) { _name = name; } return self ; } - (void )show { NSLog (@"装扮的%@" ,self .name); } @end
1 2 3 4 5 6 7 8 9 10 11 12 13 14 15 16 17 18 19 20 21 22 23 24 25 26 27 28 29 30 @interface LTFinery : LTPerson - (void )decorate:(LTPerson *)person; @end @interface LTTshirts : LTFinery @end @interface LTBigTrouser : LTFinery @end @interface LTSneakers : LTFinery @end @interface LTLeatherShoes : LTFinery @end @interface LTTie : LTFinery @end @interface LTSuit : LTFinery @end
1 2 3 4 5 6 7 8 9 10 11 12 13 14 15 16 17 18 19 20 21 22 23 24 25 26 27 28 29 30 31 32 33 34 35 36 37 38 39 40 41 42 43 44 45 46 47 48 49 50 51 52 53 54 55 56 57 58 59 60 61 62 63 64 65 66 67 68 69 70 71 72 73 74 @interface LTFinery ()@property (nonatomic , strong ) LTPerson *person;@end @implementation LTFinery - (void )decorate:(LTPerson *)person { self .person = person; } - (void )show { if (self .person) { [self .person show]; } } @end @implementation LTTshirts - (void )show { NSLog (@"大T恤" ); [super show]; } @end @implementation LTBigTrouser - (void )show { NSLog (@"垮裤" ); [super show]; } @end @implementation LTSneakers - (void )show { NSLog (@"破球鞋" ); [super show]; } @end @implementation LTLeatherShoes - (void )show { NSLog (@"皮鞋" ); [super show]; } @end @implementation LTTie - (void )show { NSLog (@"领带" ); [super show]; } @end @implementation LTSuit - (void )show { NSLog (@"西装" ); [super show]; } @end
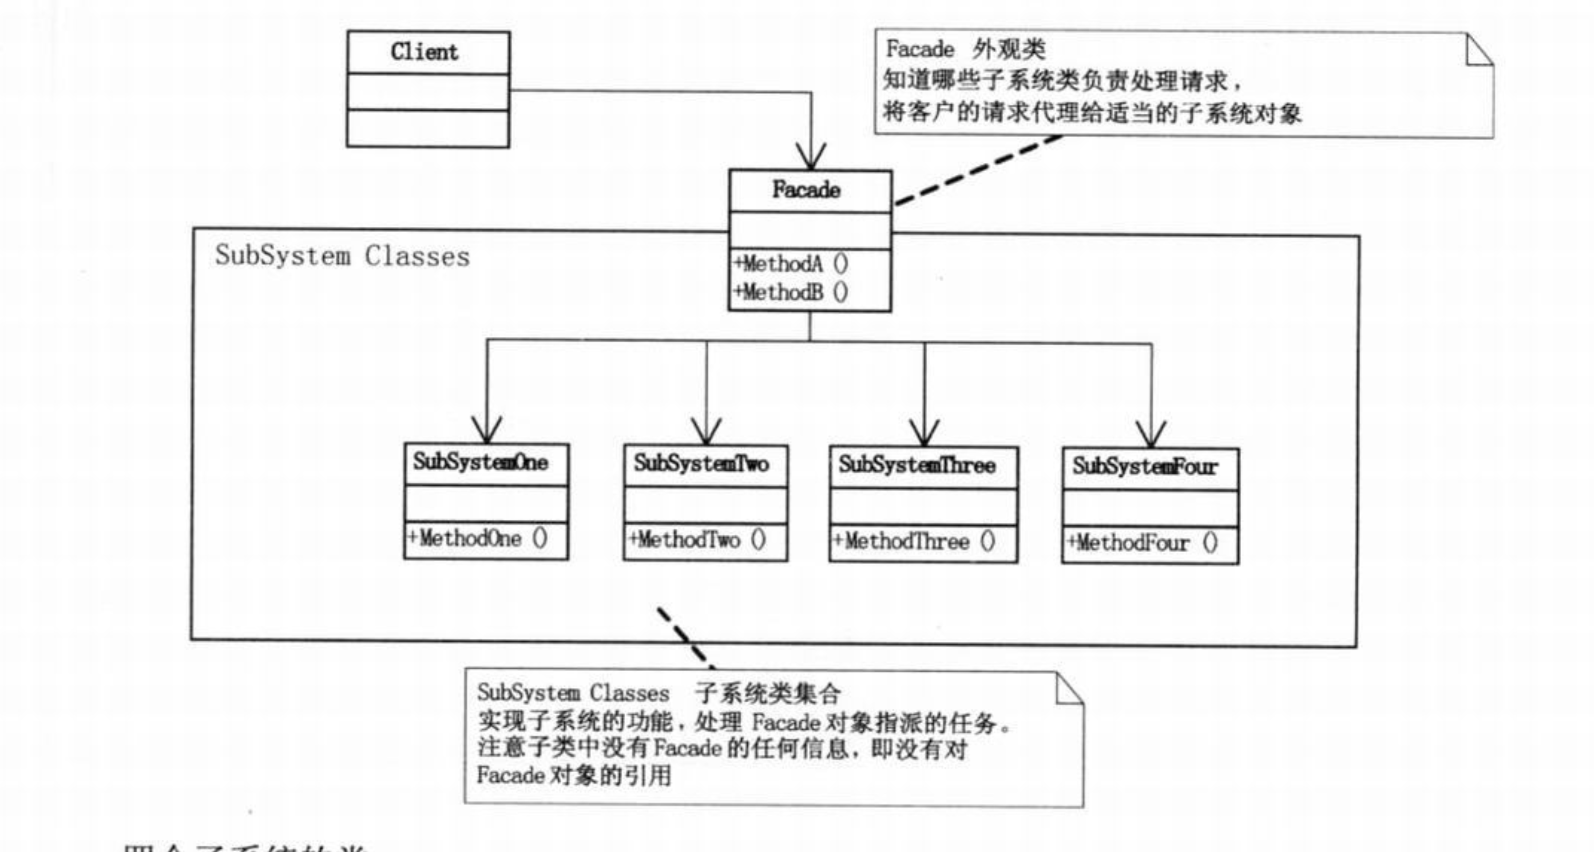
外观模式 模式动机 为子系统中的一组接口提供一个一致的界面,此模式定义了一个高层的接口,这个接口使得这一子系统更加容易使用。
模式定义 外观模式(Facade Pattern):外部与一个子系统的通信必须通过一个统一的外观对象进行,为子系统中的一组接口提供一个一致的界面,外观模式定义了一个高层接口,这个接口使得这一子系统更加容易使用。它是一种对象结构型模式。
模式结构 外观模式包含如下角色:
Facade: 外观角色
SubSystem:子系统角色
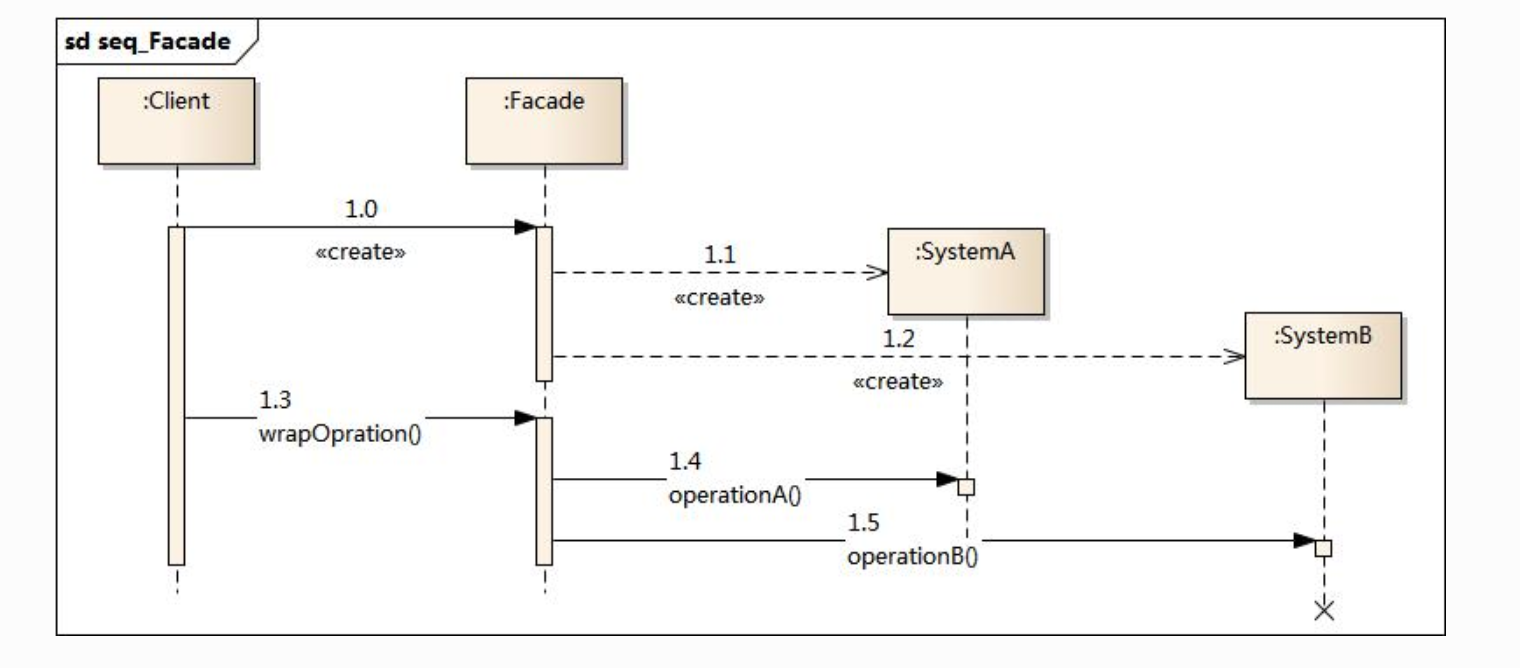
时序图
源码 1 2 3 4 HCDFound *found = [[HCDFound alloc]init]; [found buyFund]; [found sellFund];
1 2 3 4 @interface HCDstock : NSObject <HCDStockProtocol >@end
1 2 3 4 5 6 7 8 9 10 11 12 13 14 15 16 17 18 19 20 21 22 23 24 25 26 27 28 29 30 31 @interface HCDFound ()@property (nonatomic , strong ) HCDstock1 *stock1;@property (nonatomic , strong ) HCDstock2 *stock2;@property (nonatomic , strong ) HCDstock3 *stock3;@end @implementation HCDFound -(instancetype )init{ self = [super init]; if (self ) { _stock1 = [[HCDstock1 alloc]init]; _stock2 = [[HCDstock2 alloc]init]; _stock3 = [[HCDstock3 alloc]init]; } return self ; } -(void )buyFund{ [self .stock1 buy]; [self .stock2 buy]; [self .stock3 buy]; } -(void )sellFund{ [self .stock1 sell]; [self .stock2 sell]; [self .stock3 sell]; }
享元模式 模式动机 面向对象技术可以很好地解决一些灵活性或可扩展性问题,但在很多情况下需要在系统中增加类和对象的个数。当对象数量太多时,将导致运行代价过高,带来性能下降等问题。
享元模式正是为解决这一类问题而诞生的。享元模式通过共享技术实现相同或相似对象的重用。
在享元模式中可以共享的相同内容称为内部状态(IntrinsicState),而那些需要外部环境来设置的不能共享的内容称为外部状态(Extrinsic State),由于区分了内部状态和外部状态,因此可以通过设置不同的外部状态使得相同的对象可以具有一些不同的特征,而相同的内部状态是可以共享的。
在享元模式中通常会出现工厂模式,需要创建一个享元工厂来负责维护一个享元池(Flyweight Pool)用于存储具有相同内部状态的享元对象。
在享元模式中共享的是享元对象的内部状态,外部状态需要通过环境来设置。在实际使用中,能够共享的内部状态是有限的,因此享元对象一般都设计为较小的对象,它所包含的内部状态较少,这种对象也称为细粒度对象。享元模式的目的就是使用共享技术来实现大量细粒度对象的复用。
模式定义 享元模式(Flyweight Pattern):运用共享技术有效地支持大量细粒度对象的复用。系统只使用少量的对象,而这些对象都很相似,状态变化很小,可以实现对象的多次复用。由于享元模式要求能够共享的对象必须是细粒度对象,因此它又称为轻量级模式,它是一种对象结构型模式。
模式结构 享元模式包含如下角色:
Flyweight: 抽象享元类
ConcreteFlyweight: 具体享元类
UnsharedConcreteFlyweight: 非共享具体享元类
FlyweightFactory: 享元工厂类
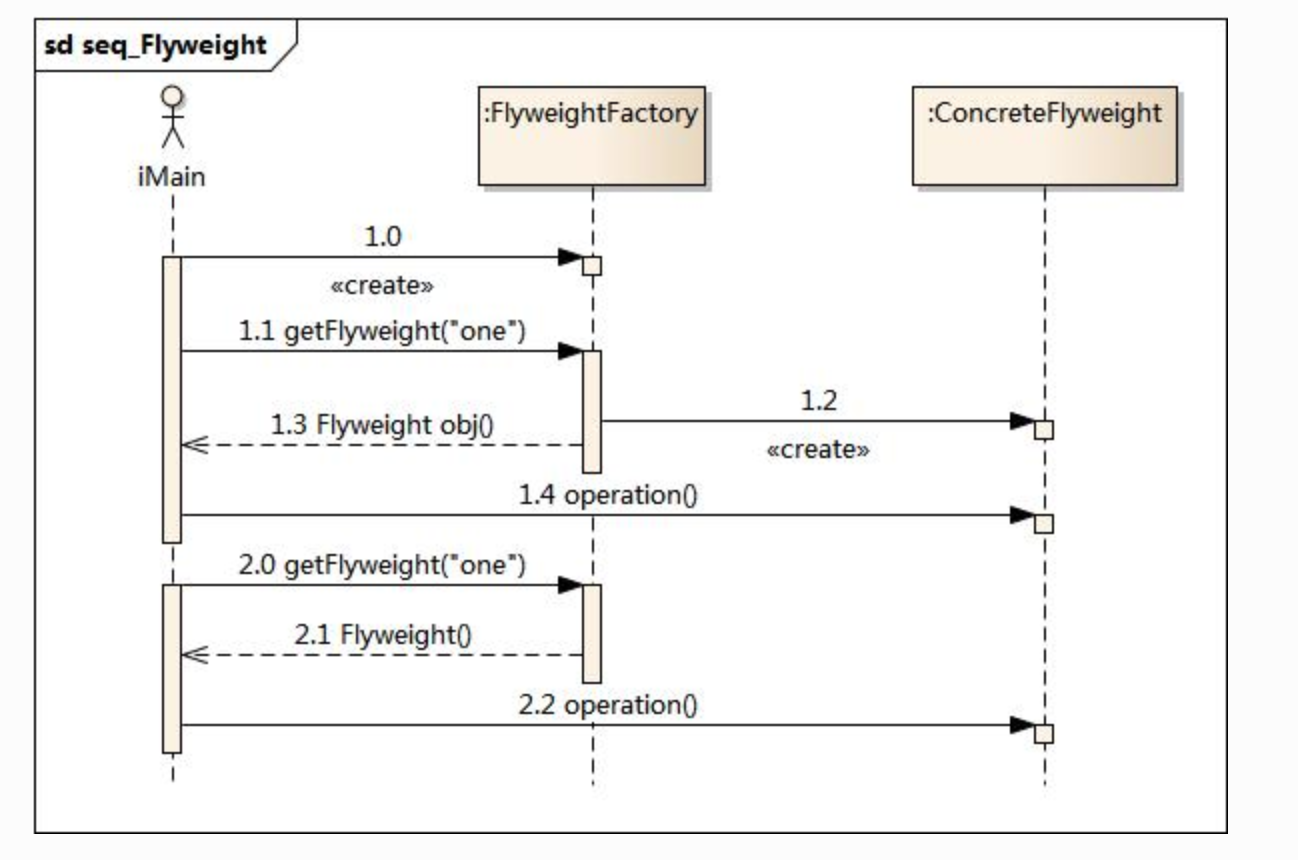
时序图
源码 1 2 3 4 5 6 7 8 9 10 11 12 13 14 15 16 HCDWebSiteFactory *facoty = [[HCDWebSiteFactory alloc]init]; HCDWebSiteType fx = [facoty getWebSiteCategory:@"产品展示" ]; HCDUser *user = [[HCDUser alloc]init]; user.name = @"小菜" ; [fx use:user]; HCDWebSiteType fy = [facoty getWebSiteCategory:@"产品展示" ]; HCDUser *user1 = [[HCDUser alloc]init]; user1.name = @"大鸟" ; [fy use:user1]; HCDWebSiteType fz = [facoty getWebSiteCategory:@"博客" ]; HCDUser *user2 = [[HCDUser alloc]init]; user2.name = @"咪咪" ; [fz use:user2];
1 2 3 4 5 6 7 8 9 10 @interface HCDWebSiteFactory : NSObject @property (nonatomic ,strong ) NSDictionary *flyweights;-(id <HCDWebSite> )getWebSiteCategory:(NSString *)webkey; -(NSInteger )getWebSiteCount; @end
1 2 3 4 5 6 7 8 9 10 11 12 13 14 15 16 17 18 19 20 21 22 23 24 25 26 27 28 29 30 31 32 33 34 35 36 @implementation HCDWebSiteFactory -(instancetype )init{ self = [super init]; if (self ) { _flyweights = [NSDictionary dictionary]; } return self ; } -(id <HCDWebSite> )getWebSiteCategory:(NSString *)webkey{ __block id <HCDWebSite> webset = nil ; [self .flyweights enumerateKeysAndObjectsUsingBlock:^(id key, id obj, BOOL *stop) { if (webkey == key) { webset = obj; *stop = YES ; } }]; if (webset == nil ) { HCDConcreteWebSite *concreteset = [[HCDConcreteWebSite alloc] init]; concreteset.webName = webkey; webset = concreteset; NSMutableDictionary *mutabledic = [NSMutableDictionary dictionaryWithDictionary:self .flyweights]; [mutabledic setObject:webset forKey:webkey]; self .flyweights = [NSDictionary dictionaryWithDictionary:mutabledic]; } return webset; } -(NSInteger )getWebSiteCount{ return self .flyweights.count; } @end
1 2 3 4 5 6 7 8 9 10 11 12 13 14 15 @interface HCDConcreteWebSite : NSObject <HCDWebSite >@property (nonatomic ,strong )NSString *webName;@end @implementation HCDConcreteWebSite -(void )use:(HCDUser *)user{ NSLog (@"网站分类:%@,用户:%@" ,self .webName,user.name); } @end
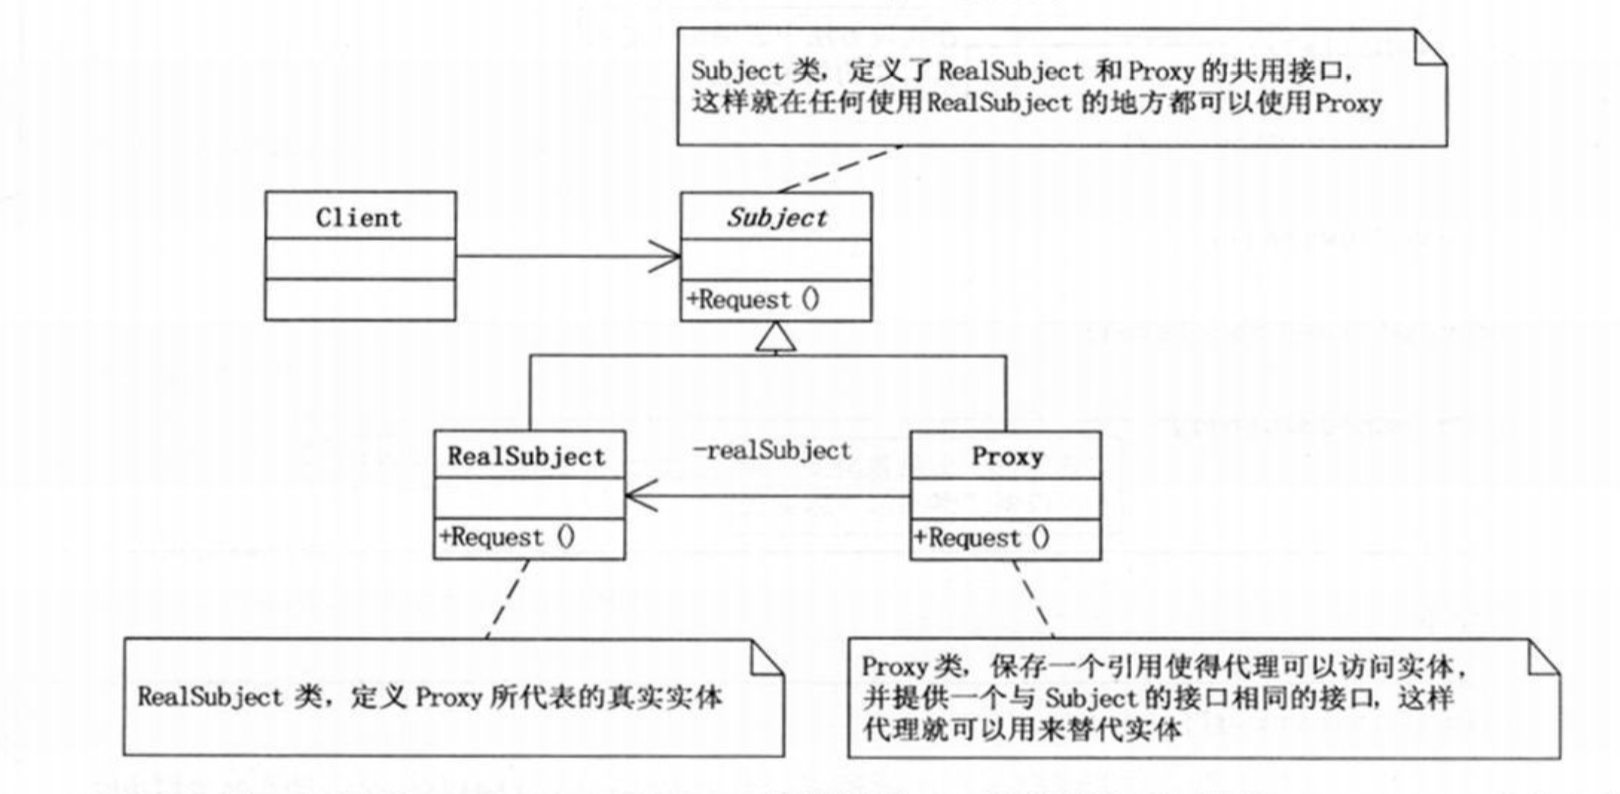
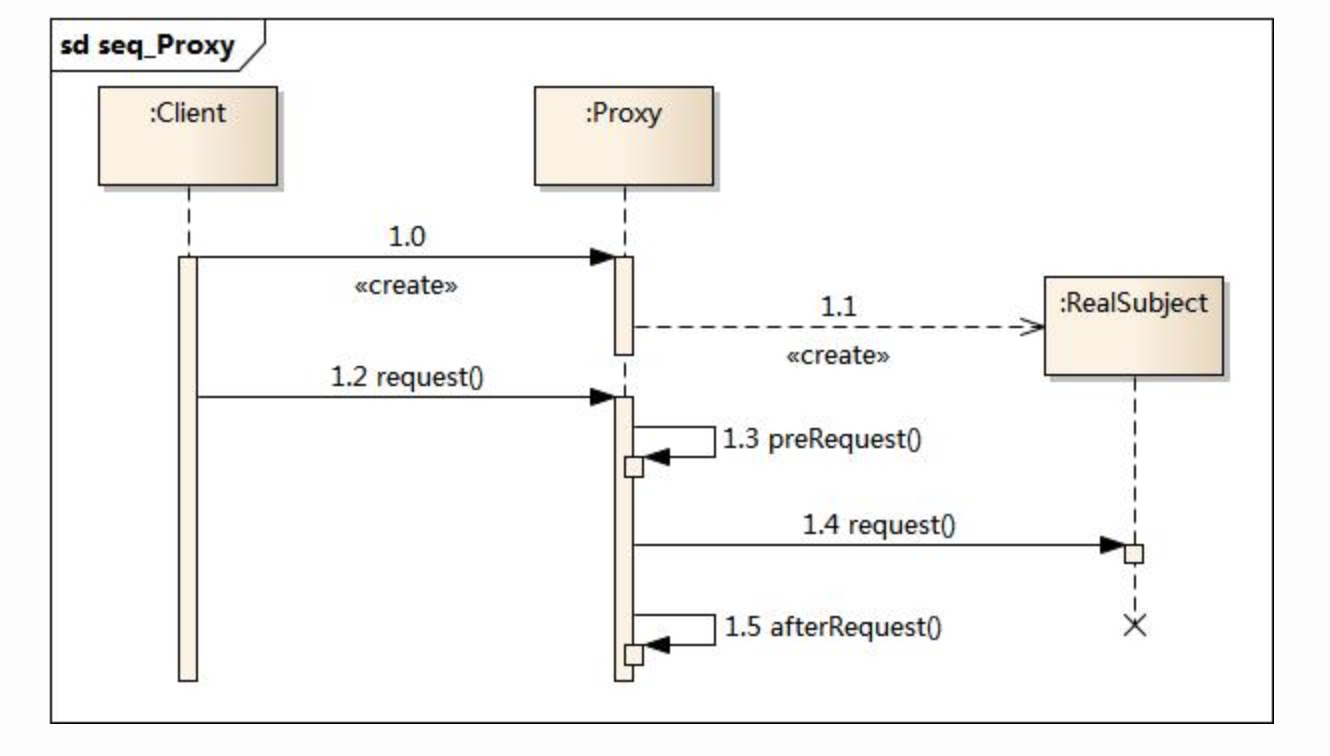
代理模式 模式动机 在某些情况下,一个客户不想或者不能直接引用一个对象,此时可以通过一个称之为“代理”的第三者来实现间接引用。代理对象可以在客户端和目标对象之间起到中介的作用,并且可以通过代理对象去掉客户不能看到的内容和服务或者添加客户需要的额外服务。
模式定义 在某些情况下,一个客户不想或者不能直接引用一个对 象,此时可以通过一个称之为“代理”的第三者来实现 间接引用。代理对象可以在客户端和目标对象之间起到 中介的作用,并且可以通过代理对象去掉客户不能看到 的内容和服务或者添加客户需要的额外服务。
模式结构 代理模式包含如下角色:
Subject: 抽象主题角色
Proxy: 代理主题角色
RealSubject: 真实主题角色
时序图
源码 1 2 3 4 5 6 7 HCDschoolGirl *girl = [[HCDschoolGirl alloc] init]; girl.name = @"哈哈哈哈哈" ; HCDproxy *proxy = [[HCDproxy alloc] initWithSchoolGirl:girl]; [proxy giveFlowers]; [proxy giveDolls]; [proxy giveChocolate];
1 2 3 4 5 6 7 8 9 10 11 12 13 14 15 16 17 18 19 20 21 22 23 24 25 26 27 28 29 30 31 32 33 34 35 36 37 38 39 40 41 42 43 44 45 46 47 48 49 50 51 52 53 54 55 56 57 58 59 60 61 62 63 64 65 66 67 68 69 70 71 72 73 74 75 @interface HCDschoolGirl : NSObject @property (nonatomic ,strong )NSString *name;@end @protocol HCDgiveGift <NSObject >- (void )giveDolls; - (void )giveFlowers; - (void )giveChocolate; @end @interface HCDpursuit ()@property (nonatomic ,strong )HCDschoolGirl *schoolGirl;@end @implementation HCDpursuit -(instancetype )initWithSchoolGirl:(HCDschoolGirl *)schoolGirl{ self = [super init]; if (self ) { _schoolGirl = schoolGirl; } return self ; } -(void )giveChocolate{ NSLog (@"送你巧克力%@" ,self .schoolGirl.name); } -(void )giveDolls{ NSLog (@"送你洋娃娃%@" ,self .schoolGirl.name); } -(void )giveFlowers{ NSLog (@"送你玫瑰花%@" ,self .schoolGirl.name); } @end @interface HCDproxy ()@property (strong , nonatomic ) HCDpursuit *pursuit;@end @implementation HCDproxy - (instancetype )initWithSchoolGirl:(HCDschoolGirl *)schoolGirl { self = [super init]; if (self ) { self .pursuit = [[HCDpursuit alloc] initWithSchoolGirl:schoolGirl]; } return self ; } - (void )giveDolls { [self .pursuit giveDolls]; } - (void )giveFlowers { [self .pursuit giveFlowers]; } - (void )giveChocolate { [self .pursuit giveChocolate]; } @end
行为型模式 迭代器模式 模式动机 针对不同的需要,可能还要以不同的方式遍历整个聚合对象,但是我们并不希望在聚合对象的抽象层接口中充斥着各种不同遍历的操作。
模式定义 提供一种方法顺序访问一个聚合对象中的各个元素,而又不暴露该对象的内部表示。
模式结构 模板方法模式包含如下角色:
Aggregate: 聚集抽象类
ConcreteAggregate: 具体聚集类
Iterator: 迭代抽象类
ConcreteIterator: 具体迭代器类
时序图 略
源码 略
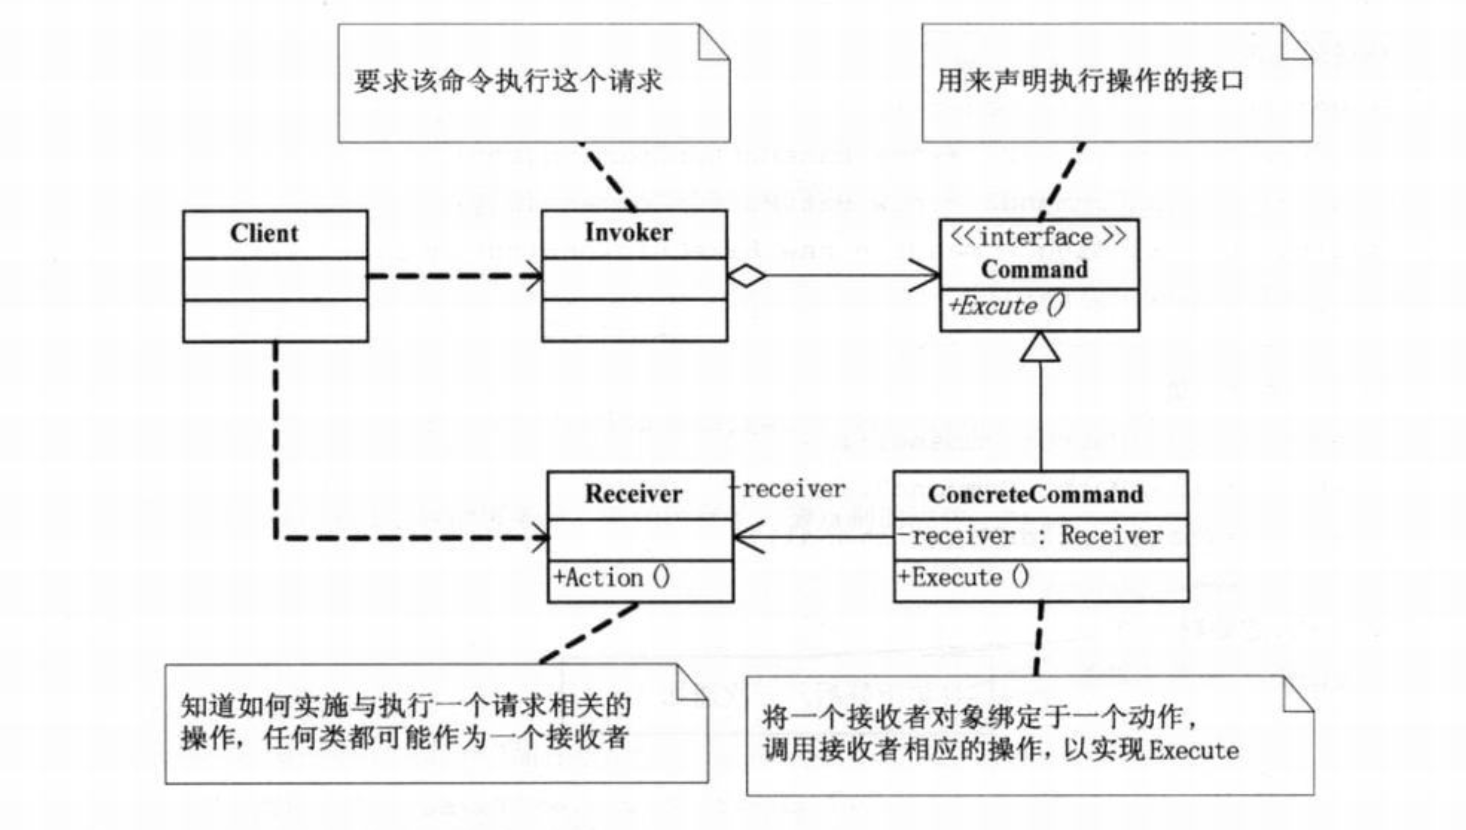
命令模式 模式动机 在软件设计中,我们经常需要向某些对象发送请求,但是并不知道请求的接收者是谁,也不知道被请求的操作是哪个,我们只需在程序运行时指定具体的请求接收者即可,此时,可以使用命令模式来进行设计,使得请求发送者与请求接收者消除彼此之间的耦合,让对象之间的调用关系更加灵活。
命令模式可以对发送者和接收者完全解耦,发送者与接收者之间没有直接引用关系,发送请求的对象只需要知道如何发送请求,而不必知道如何完成请求。这就是命令模式的模式动机。
模式定义 命令模式(Command Pattern):将一个请求封装为一个对象,从而使我们可用不同的请求对客户进行参数化;对请求排队或者记录请求日志,以及支持可撤销的操作。命令模式是一种对象行为型模式,其别名为动作(Action)模式或事务(Transaction)模式。
模式结构 命令模式包含如下角色:
Command: 抽象命令类
ConcreteCommand: 具体命令类
Invoker: 调用者
Receiver: 接收者
Client:客户类
时序图
源码 1 2 3 4 5 6 7 8 9 10 11 12 13 14 15 16 17 18 19 20 21 22 HCDWaiter *waiter = [[HCDWaiter alloc]init]; HCDCustomr *customer = [[HCDCustomr alloc]init]; HCDOrder *customerOrder1 = [customer pushOrderWithString:@"顾客一要十串羊肉" type:orderTypeMutton]; HCDOrder *customerOrder2 = [customer pushOrderWithString:@"顾客一要十串鸭肉" type:orderTypeDuck]; [waiter addOrder:customerOrder1]; [waiter addOrder:customerOrder2]; HCDCustomr *customer1 = [[HCDCustomr alloc]init]; HCDOrder *customer1Order1 = [customer1 pushOrderWithString:@"顾客二要二十串鸡肉" type:orderTypeChicken]; HCDOrder *customer1Order2 = [customer1 pushOrderWithString:@"顾客二要二十串鸭肉" type:orderTypeDuck]; [waiter addOrder:customer1Order1]; [waiter addOrder:customer1Order2]; [waiter deleteOrder:customer1Order2]; [waiter notifyOrder];
1 2 3 4 5 6 7 8 9 10 11 12 13 14 15 16 17 18 19 @implementation HCDCustomr -(HCDOrder *)pushOrderWithString:(NSString *)string type:(orderType)type{ HCDOrder *order = nil ; switch (type) { case orderTypeMutton: order = [[HCDMuttonOrder alloc]initWithOrderString:string]; break ; case orderTypeChicken: order = [[HCDChickenOrder alloc]initWithOrderString:string]; break ; case orderTypeDuck: order = [[HCDDuckOrder alloc]initWithOrderString:string]; break ; } return order; } @end
1 2 3 4 5 6 7 8 9 10 11 12 13 14 15 16 17 18 19 20 21 22 23 24 25 26 27 28 @implementation HCDWaiter -(instancetype )init{ self = [super init]; if (self ) { _orderList = [NSMutableArray array]; } return self ; } -(void )addOrder:(HCDOrder *)order{ NSLog (@"添加Order" ); [self .orderList addObject:order]; } -(void )deleteOrder:(HCDOrder *)order{ NSLog (@"取消Order" ); [self .orderList removeObject:order]; } -(void )notifyOrder{ NSLog (@"====开始执行Order===" ); for (HCDOrder *order in self .orderList) { [order executeOrder]; } } @end
1 2 3 4 5 6 7 8 9 10 11 12 13 14 15 16 17 18 19 20 21 22 23 24 25 26 27 28 29 30 31 32 33 34 35 36 37 38 39 @interface HCDOrder : NSObject @property (nonatomic ,copy )NSString *orderString;-(instancetype )initWithOrderString:(NSString *)orderString; -(void )executeOrder; @end @implementation HCDMuttonOrder -(void )executeOrder{ NSLog (@"烤羊" ); [[HCDWorker sharedWorker] doMuttonWork:self .orderString]; } @end @implementation HCDChickenOrder -(void )executeOrder{ NSLog (@"烤鸡" ); [[HCDWorker sharedWorker] doChickenWork:self .orderString]; } @end @implementation HCDDuckOrder -(void )executeOrder{ NSLog (@"烤鸭" ); [[HCDWorker sharedWorker] doChickenWork:self .orderString]; } @end
1 2 3 4 5 6 7 8 9 10 11 12 @interface HCDWorker : NSObject +(instancetype )sharedWorker; -(void )doMuttonWork:(NSString *)work; -(void )doChickenWork:(NSString *)work; -(void )doDuckWork:(NSString *)work; @end
中介者模式 模式动机
在用户与用户直接聊天的设计方案中,用户对象之间存在很强的关联性,将导致系统出现如下问题:
系统结构复杂:对象之间存在大量的相互关联和调用,若有一个对象发生变化,则需要跟踪和该对象关联的其他所有对象,并进行适当处理。
对象可重用性差:由于一个对象和其他对象具有很强的关联,若没有其他对象的支持,一个对象很难被另一个系统或模块重用,这些对象表现出来更像一个不可分割的整体,职责较为混乱。
系统扩展性低:增加一个新的对象需要在原有相关对象上增加引用,增加新的引用关系也需要调整原有对象,系统耦合度很高,对象操作很不灵活,扩展性差。
在面向对象的软件设计与开发过程中,根据“单一职责原则”,我们应该尽量将对象细化,使其只负责或呈现单一的职责。
对于一个模块,可能由很多对象构成,而且这些对象之间可能存在相互的引用,为了减少对象两两之间复杂的引用关系,使之成为一个松耦合的系统,我们需要使用中介者模式,这就是中介者模式的模式动机。
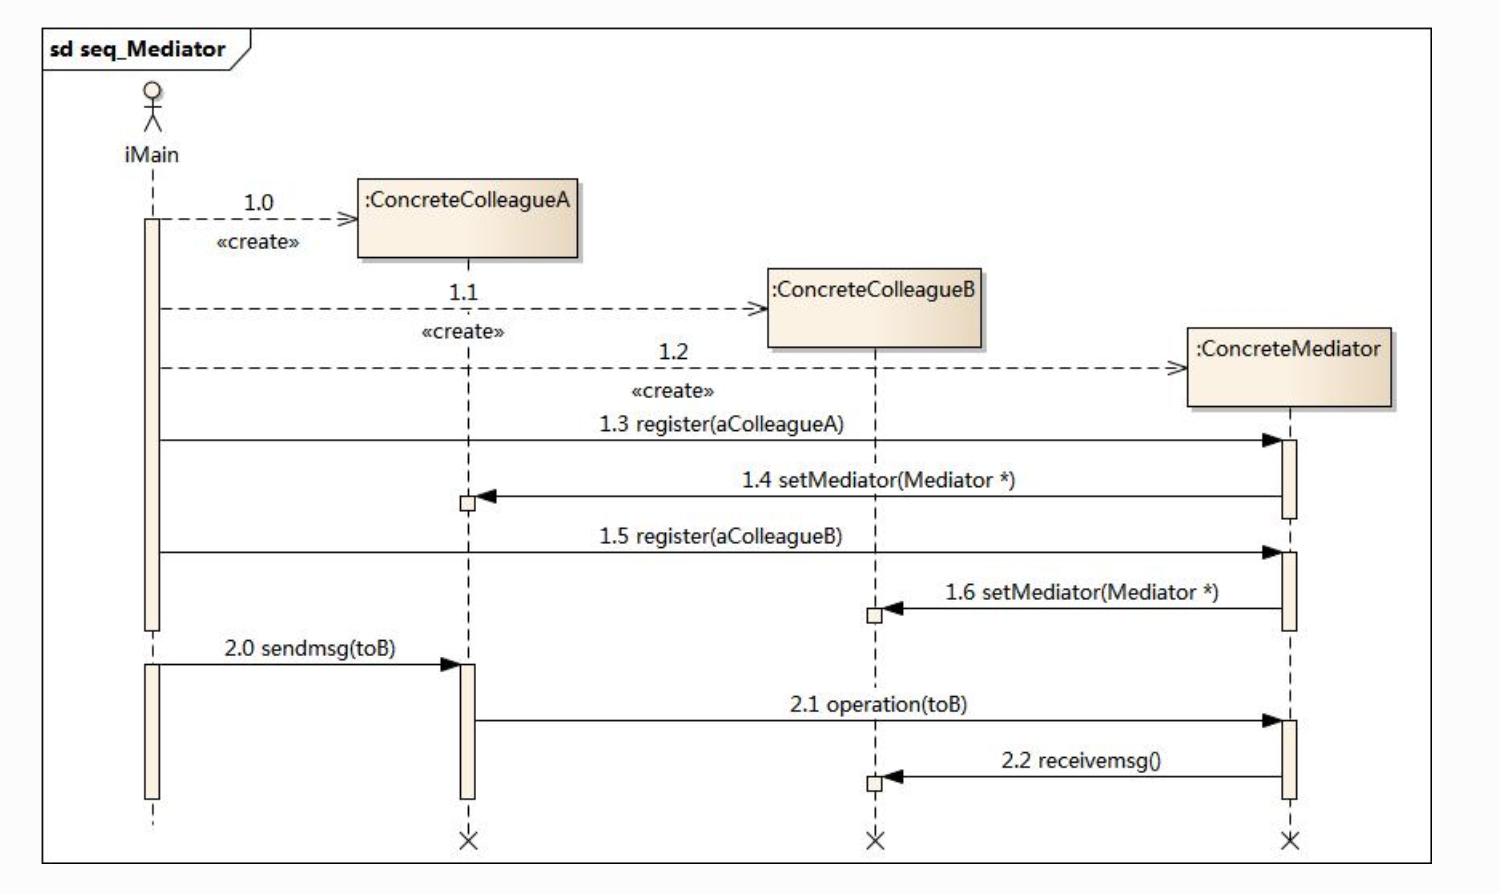
模式定义 中介者模式(Mediator Pattern)定义:用一个中介对象来封装一系列的对象交互,中介者使各对象不需要显式地相互引用,从而使其耦合松散,而且可以独立地改变它们之间的交互。它是一种对象行为型模式。
模式结构 中介者模式包含如下角色:
Mediator: 抽象中介者
ConcreteMediator: 具体中介者
Colleague: 抽象同事类
ConcreteColleague: 具体同事类
时序图
源码 1 2 3 4 5 6 7 8 9 10 11 12 13 ConcreteMediator *mediator = [[ConcreteMediator alloc] init]; ConcreteColleague1 *c1 = [[ConcreteColleague1 alloc] initWithMediator:mediator]; ConcreteColleague2 *c2 = [[ConcreteColleague2 alloc] initWithMediator:mediator]; mediator.colleague1 = c1; mediator.colleague2 = c2; [c1 send:@"吃过饭了吗?" ]; [c2 send:@"没有呢,你打算请客?" ];
1 2 3 4 5 6 7 8 9 10 @class Colleague ;@interface Mediator : NSObject @property (nonatomic , strong ) Colleague *colleague1;@property (nonatomic , strong ) Colleague *colleague2;-(void )send:(NSString *)message colleague:(Colleague *)colleague; @end
1 2 3 4 5 6 7 8 9 10 11 12 @implementation ConcreteMediator -(void )send:(NSString *)message colleague:(Colleague *)colleague{ if (colleague == self .colleague1) { [self .colleague2 notify:message]; }else { [self .colleague1 notify:message]; } } @end
1 2 3 4 5 6 7 8 9 10 11 12 13 @class Mediator ;@interface Colleague : NSObject @property (nonatomic , strong ) Mediator *mediator;-(instancetype )initWithMediator:(Mediator *)mediator; -(void )notify:(NSString *)message; -(void )send:(NSString *)message; @end
1 2 3 4 5 6 7 8 9 10 11 12 13 14 15 16 17 18 19 20 21 @implementation ConcreteColleague1 -(instancetype )initWithMediator:(Mediator *)mediator{ self = [super init]; if (self ) { self .mediator = mediator; } return self ; } -(void )send:(NSString *)message{ NSLog (@"同事1发送了信息" ); [self .mediator send:message colleague:self ]; } -(void )notify:(NSString *)message{ NSLog (@"%@%@" ,@"同事1得到消息:" , message); } @end
1 2 3 4 5 6 7 8 9 10 11 12 13 14 15 16 17 18 19 20 21 @implementation ConcreteColleague2 -(instancetype )initWithMediator:(Mediator *)mediator{ self = [super init]; if (self ) { self .mediator = mediator; } return self ; } -(void )send:(NSString *)message{ NSLog (@"同事2发送了信息" ); [self .mediator send:message colleague:self ]; } -(void )notify:(NSString *)message{ NSLog (@"%@%@" ,@"同事2得到消息" , message); } @end
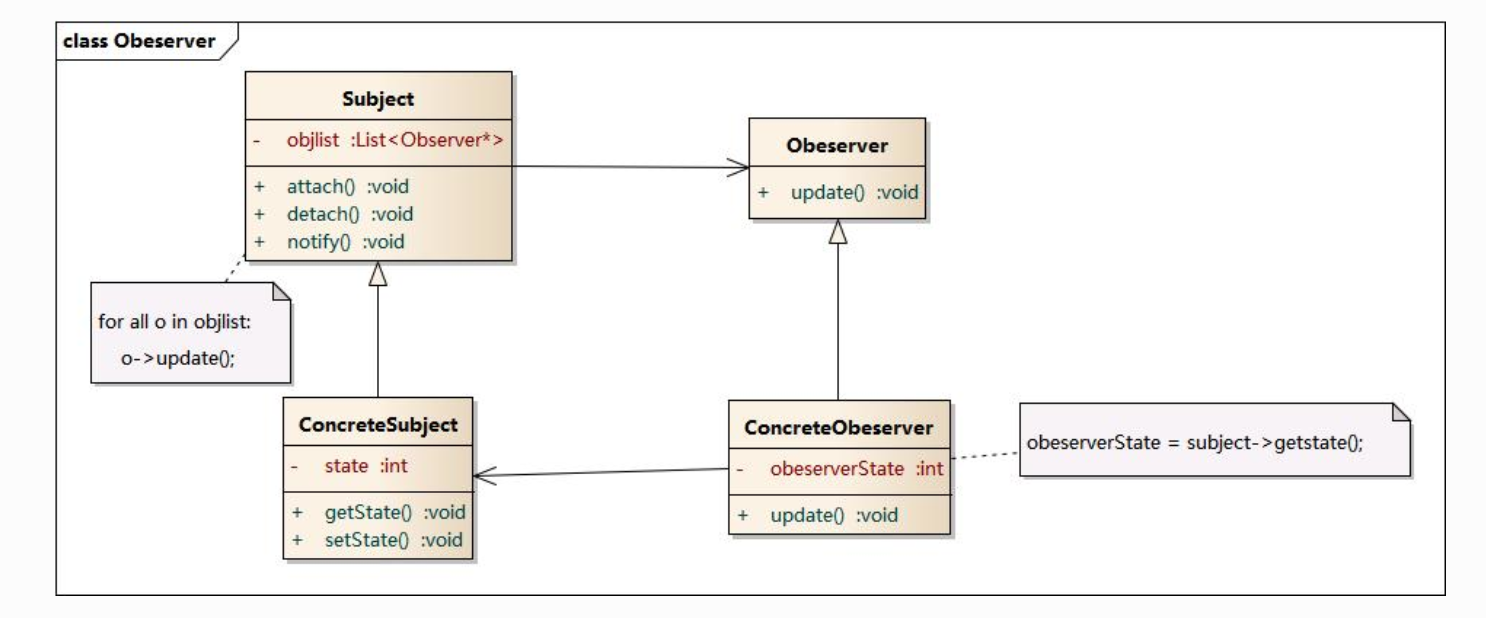
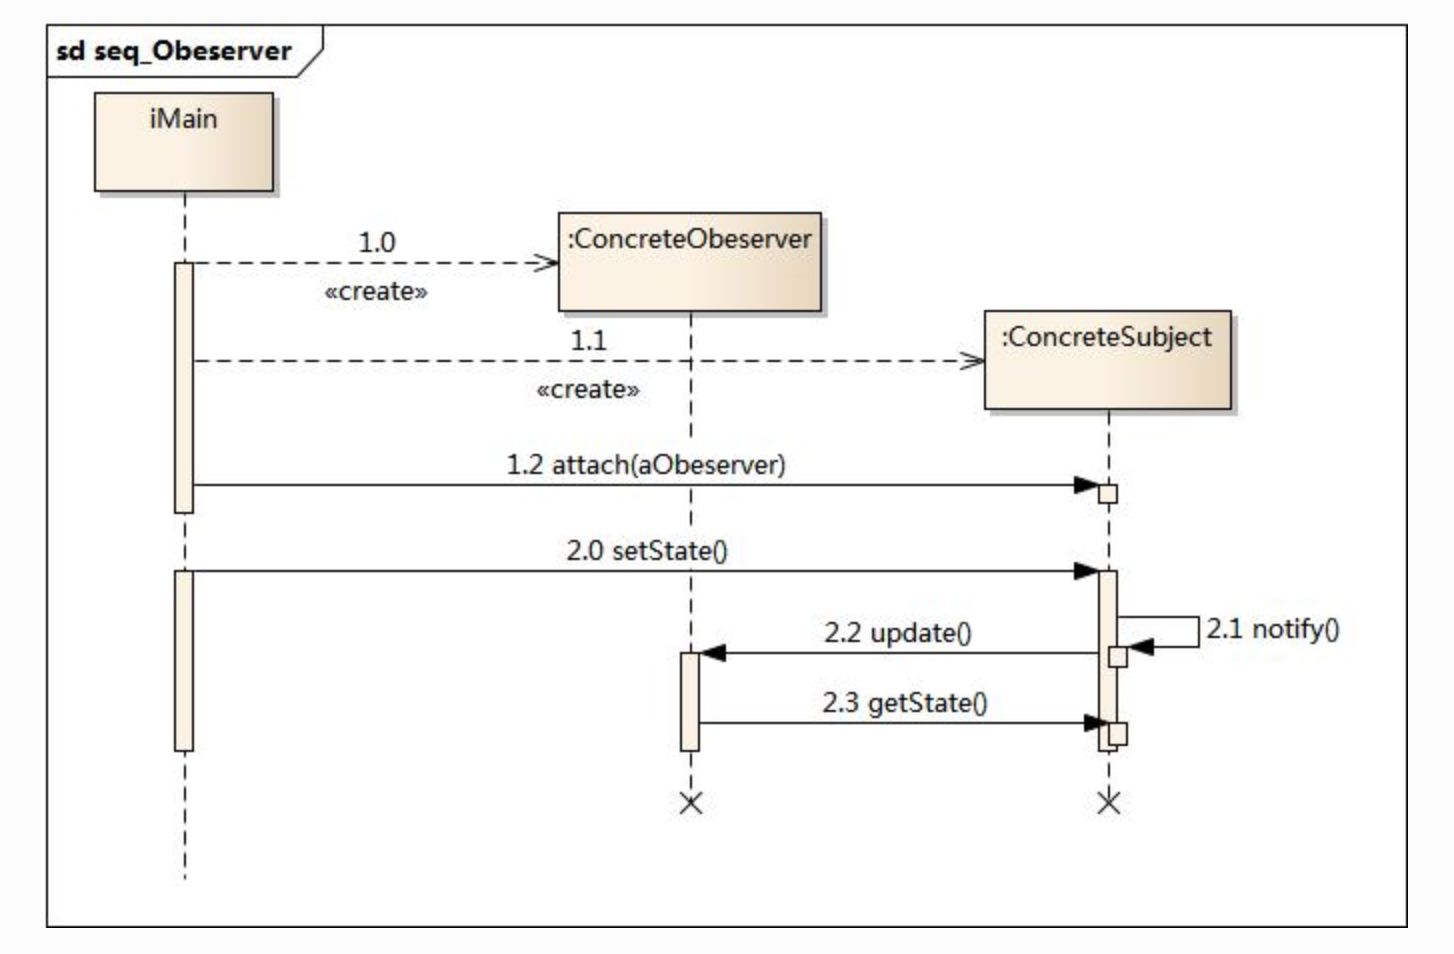
观察者模式 模式动机 建立一种对象与对象之间的依赖关系,一个对象发生改变时将自动通知其他对象,其他对象将相应做出反应。在此,发生改变的对象称为观察目标,而被通知的对象称为观察者,一个观察目标可以对应多个观察者,而且这些观察者之间没有相互联系,可以根据需要增加和删除观察者,使得系统更易于扩展,这就是观察者模式的模式动机。
模式定义 观察者模式(Observer Pattern):定义对象间的一种一对多依赖关系,使得每当一个对象状态发生改变时,其相关依赖对象皆得到通知并被自动更新。观察者模式是一种对象行为型模式。
模式结构 观察者模式包含如下角色:
Subject: 目标
ConcreteSubject: 具体目标
Observer: 观察者
ConcreteObserver: 具体观察者
时序图
源码 1 2 3 4 5 6 7 8 9 10 11 12 13 14 15 16 17 18 19 20 21 22 23 24 25 26 27 28 29 30 31 32 33 34 35 36 37 38 39 - (void )viewDidLoad { [super viewDidLoad]; HCDServiceCenter *serviceCenter = [[HCDServiceCenter alloc] init]; [serviceCenter addDelegate:self .nbaobserver]; [serviceCenter addDelegate:self .stockobserver]; [serviceCenter addDelegate:self .gameObserver]; NSLog (@"秘书通知:老板回来了,大家赶紧撤" ); [serviceCenter notifyServiceDelegate:@selector (update) perform:^(id responder) { [responder update]; }]; } #pragma mark - getter & setter -(HCDNBAObserver *)nbaobserver { if (!_nbaobserver) { _nbaobserver = [[HCDNBAObserver alloc] init]; } return _nbaobserver; } -(HCDStockObserver *)stockobserver { if (!_stockobserver) { _stockobserver = [[HCDStockObserver alloc] init]; } return _stockobserver; } -(HCDGameObserver *)gameObserver { if (!_gameObserver) { _gameObserver = [[HCDGameObserver alloc] init]; } return _gameObserver; }
1 2 3 4 5 6 7 8 9 10 11 12 13 14 15 @interface HCDServiceCenter : NSObject @property (nonatomic , strong , readonly ) NSHashTable *responders;- (instancetype )initWithNotifyQueue:(dispatch_queue_t )notifyQueue; - (void )addDelegate:(id )delegate; - (void )removeDelegate:(id )delegate; - (void )notifyServiceDelegate:(SEL)aSelector perform:(void (^)(id responder))perform; @end
1 2 3 4 5 6 7 8 9 10 11 12 13 14 15 16 17 18 19 20 21 22 23 24 25 26 27 28 29 30 31 32 33 34 35 36 37 38 39 40 41 42 43 44 45 46 47 48 49 50 51 52 53 54 55 56 57 58 59 60 61 62 #define LOCK(...) dispatch_semaphore_wait(_lock, DISPATCH_TIME_FOREVER); \ __VA_ARGS__; \ dispatch_semaphore_signal(_lock); @interface HCDServiceCenter ()@property (nonatomic , strong ) dispatch_queue_t notifyQueue;@property (nonatomic , strong ) NSHashTable *responders;@end @implementation HCDServiceCenter dispatch_semaphore_t _lock; } - (instancetype )init { self = [super init]; if (self ) { self .responders = [NSHashTable weakObjectsHashTable]; self .notifyQueue = dispatch_get_main_queue(); _lock = dispatch_semaphore_create(1 ); } return self ; } - (instancetype )initWithNotifyQueue:(dispatch_queue_t )notifyQueue { self = [super init]; if (self ) { self .responders = [NSHashTable weakObjectsHashTable]; self .notifyQueue = notifyQueue; } return self ; } - (void )addDelegate:(id )delegate { LOCK([self .responders addObject:delegate]); } - (void )removeDelegate:(id )delegate { LOCK([self .responders removeObject:delegate]); } - (void )notifyServiceDelegate:(SEL)aSelector perform:(void (^)(id responder))perform { dispatch_async (self .notifyQueue, ^{ NSArray *responders = self .responders.allObjects; for (id responder in responders) { if ([responder respondsToSelector:aSelector]) { @try { perform(responder); } @catch (NSException *exception) { NSLog (@"catch notifyServiceDelegate exception: %@" , exception); } } } }); } @end
1 2 3 4 5 6 7 8 9 10 11 12 13 14 15 16 17 18 19 20 21 22 @protocol HCDObserver <NSObject >@optional - (void )update; @end @interface HCDStockObserver : NSObject <HCDObserver >@end @interface HCDNBAObserver : NSObject <HCDObserver >@end @interface HCDGameObserver : NSObject <HCDObserver >@end
状态模式 模式动机 在很多情况下,一个对象的行为取决于一个或多个动态变化的属性,这样的属性叫做状态,这样的对象叫做有状态的(stateful)对象,这样的对象状态是从事先定义好的一系列值中取出的。当一个这样的对象与外部事件产生互动时,其内部状态就会改变,从而使得系统的行为也随之发生变化。
状态模式主要解决的是当控制一个对象状态转换的条件表达式过于负责时的情况。把状态的判断逻辑转移到表示不同状态的一系列类当中,可以把复杂的判断逻辑简化。
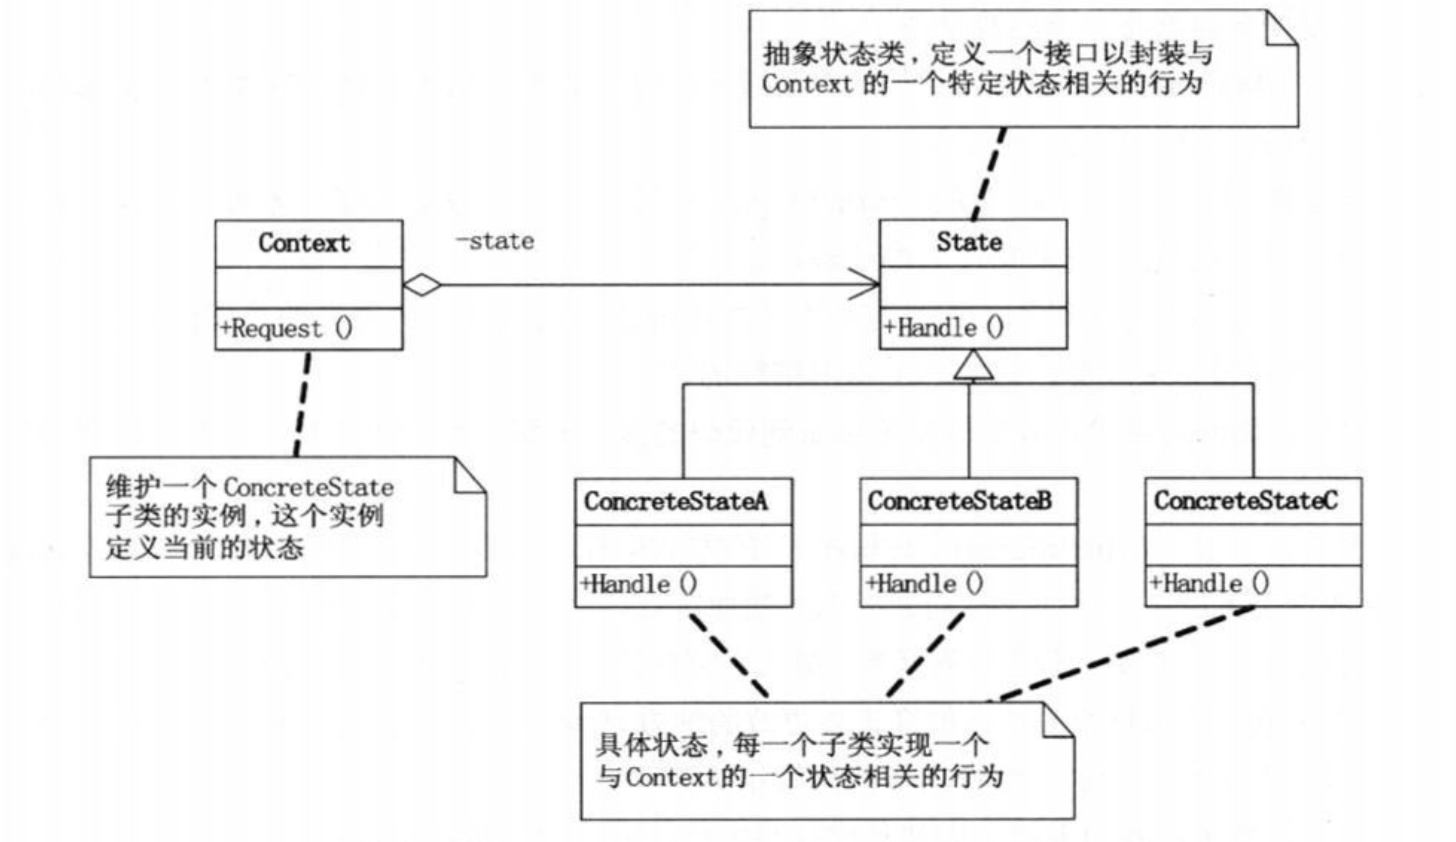
模式定义 允许一个对象在其内部状态改变时改变它的行为,对象看起来似乎修改了它的类。状态模式是一种对象行为型模式。
模式结构 状态模式包含如下角色:
Context: 环境类
State: 抽象状态类
ConcreteState: 具体状态类
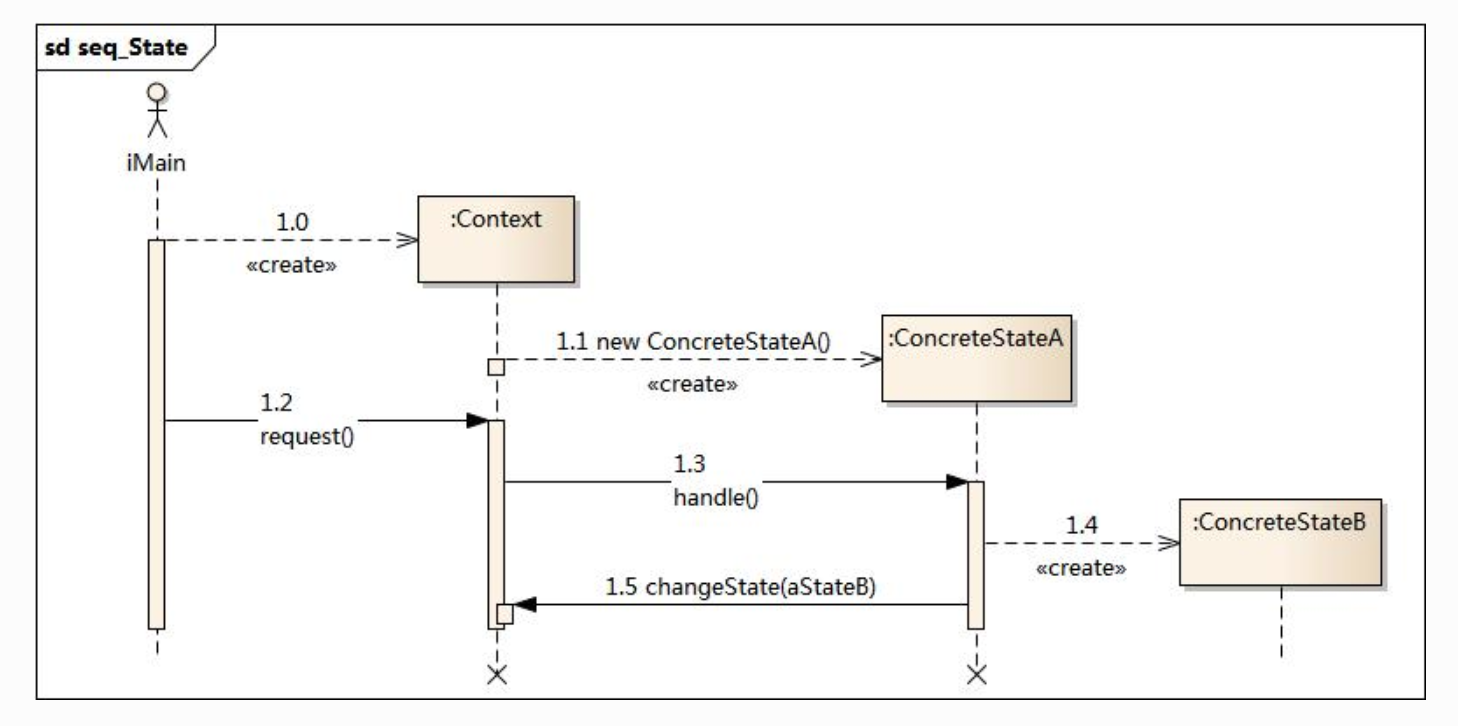
时序图
源码 1 2 3 4 5 6 7 8 9 10 11 12 13 14 15 16 17 18 19 20 21 22 23 24 25 26 27 28 HCDWork *work = [[HCDWork alloc]init]; work.hour = 9 ; [work writeProgram]; work.hour = 10 ; [work writeProgram]; work.hour = 12 ; [work writeProgram]; work.hour = 13 ; [work writeProgram]; work.hour = 14 ; [work writeProgram]; work.hour = 17 ; [work writeProgram]; work.finished = NO ; [work writeProgram]; work.hour = 19 ; [work writeProgram]; work.hour = 22 ; [work writeProgram];
1 2 3 4 5 6 7 8 9 10 11 12 @interface HCDWork : NSObject @property (nonatomic , assign ) CGFloat hour;@property (nonatomic , assign ) BOOL finished;- (void )writeProgram; - (void )changeState:(HCDState *)state; @end
1 2 3 4 5 6 7 8 9 10 11 12 13 14 15 16 17 18 19 20 21 22 23 24 25 26 @interface HCDWork ()@property (nonatomic , strong ) HCDState *state;@end @implementation HCDWork - (instancetype )init{ self = [super init]; if (self ) { self .state = [[HCDForenoonState alloc]init]; } return self ; } - (void )writeProgram { [self .state writeProgram:self ]; } - (void )changeState:(HCDState *)state { self .state = state; } @end
1 2 3 4 5 6 7 8 @class HCDWork ;@protocol HCDProtocol <NSObject >@optional - (void )writeProgram:(HCDWork *)work; @end
1 2 3 4 @interface HCDState : NSObject <HCDProtocol >@end
1 2 3 4 5 6 7 8 9 10 11 12 13 @implementation HCDForenoonState -(void )writeProgram:(HCDWork *)work{ if (work.hour < 12 ) { NSLog (@"当前时间:{%.f}点,上午工作,精神百倍" , work.hour); }else { HCDNoonState *noonState = [[HCDNoonState alloc] init]; [work changeState:noonState]; [work writeProgram]; } } @end
1 2 3 4 5 6 7 8 9 10 11 12 13 @implementation HCDNoonState -(void )writeProgram:(HCDWork *)work{ if (work.hour < 13 ) { NSLog (@"当前时间:{%.f}点,饿了,午饭;犯困,午休" , work.hour); } else { HCDAfternoonState *afternoonState = [[HCDAfternoonState alloc] init]; [work changeState:afternoonState]; [work writeProgram]; } } @end
1 2 3 4 5 6 7 8 9 10 11 12 13 @implementation HCDAfternoonState -(void )writeProgram:(HCDWork *)work{ if (work.hour < 17 ) { NSLog (@"当前时间:{%.f}点,下午状态还不错,继续努力" , work.hour); } else { HCDEventState *eventState = [[HCDEventState alloc] init]; [work changeState:eventState]; [work writeProgram]; } } @end
1 2 3 4 5 6 7 8 9 10 11 12 13 14 15 16 17 18 19 20 21 @implementation HCDEventState -(void )writeProgram:(HCDWork *)work{ if (work.finished) { HCDRestState *restState = [[HCDRestState alloc] init]; [work changeState:restState]; [work writeProgram]; } else { if (work.hour < 21 ) { NSLog (@"当前时间:{%.f}点,加班哦,疲累之极" , work.hour); } else { HCDSleepState *sleepState = [[HCDSleepState alloc] init]; [work changeState:sleepState]; [work writeProgram]; } } } @end
1 2 3 4 5 6 7 @implementation HCDSleepState - (void )writeProgram:(HCDWork *)work { NSLog (@"当前时间:{%.f}点,不行了,睡着了" , work.hour); } @end
1 2 3 4 5 6 7 @implementation HCDRestState - (void )writeProgram:(HCDWork *)work { NSLog (@"当前时间:{%.f}点,下班回家了" , work.hour); } @end
策略模式 模式动机
完成一项任务,往往可以有多种不同的方式,每一种方式称为一个策略,我们可以根据环境或者条件的不同选择不同的策略来完成该项任务。
在软件开发中也常常遇到类似的情况,实现某一个功能有多个途径,此时可以使用一种设计模式来使得系统可以灵活地选择解决途径,也能够方便地增加新的解决途径。
为了解决这些问题,可以定义一些独立的类来封装不同的算法,每一个类封装一个具体的算法,在这里,每一个封装算法的类我们都可以称之为策略(Strategy),为了保证这些策略的一致性,一般会用一个抽象的策略类来做算法的定义,而具体每种算法则对应于一个具体策略类。
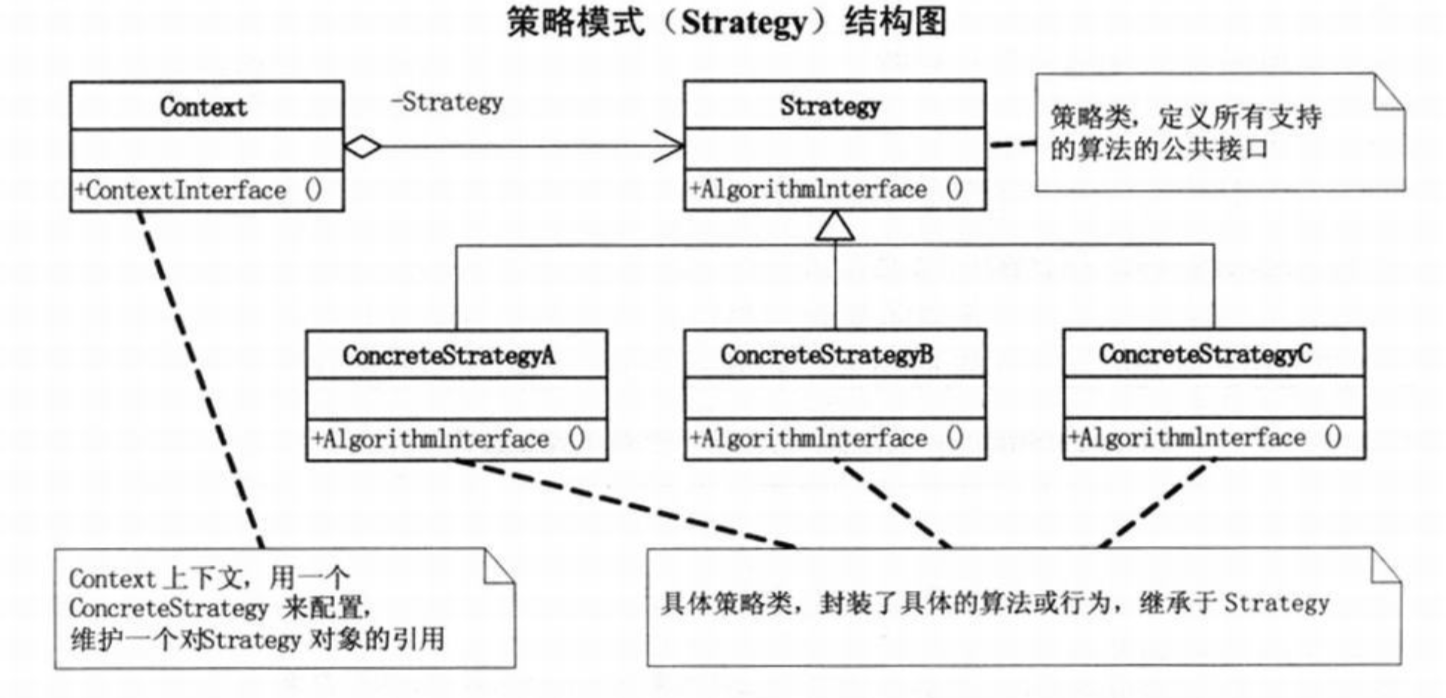
模式定义 定义了算法家族,分别封装起来,让它们之间可以互相替换,此模式让算法的变化,不会影响到使用算法的客户。
模式结构 策略模式包含如下角色:
Context: 环境类
Strategy: 抽象策略类
ConcreteStrategy: 具体策略类
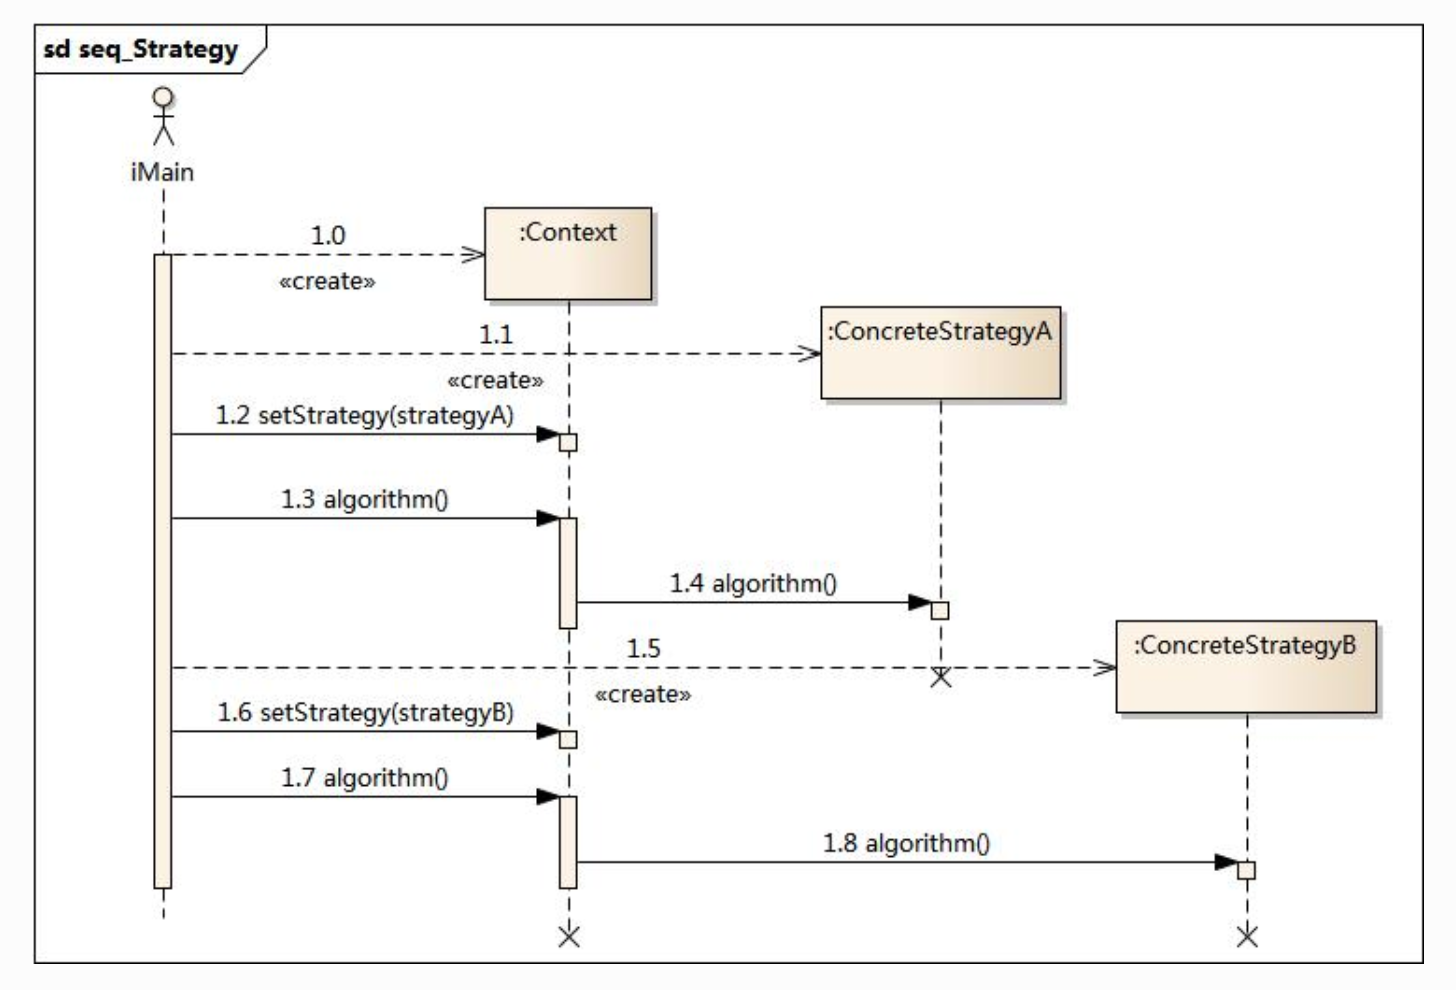
时序图
源码 1 2 3 4 5 6 7 8 9 HCDCashContext *context = [[HCDCashContext alloc] initWithCashType:HCDCashTypeNormal]; NSLog (@"结果是%f" ,[context getResult:100 ]);HCDCashContext *contextReturn = [[HCDCashContext alloc] initWithCashType:HCDCashTypeReturn]; NSLog (@"结果是%f" ,[contextReturn getResult:100 ]);HCDCashContext *contextRobate = [[HCDCashContext alloc] initWithCashType:HCDCashTypeRobate]; NSLog (@"结果是%f" ,[contextRobate getResult:100 ]);
1 2 3 4 5 6 7 8 9 10 11 12 13 14 typedef NS_ENUM (NSInteger , HCDCashType){ HCDCashTypeNormal = 0 , HCDCashTypeRobate, HCDCashTypeReturn }; @interface HCDCashContext : NSObject -(instancetype )initWithCashType:(HCDCashType)type; -(CGFloat )getResult:(CGFloat )money; @end
1 2 3 4 5 6 7 8 9 10 11 12 13 14 15 16 17 18 19 20 21 22 23 24 25 26 27 28 29 30 31 32 33 34 35 36 37 38 39 @interface HCDCashContext ()@property (nonatomic , strong ) id <HCDCashProtocol> cash;@end @implementation HCDCashContext -(instancetype )initWithCashType:(HCDCashType)type{ self = [super init]; if (self ) { [self cofigureWithCashType:type]; } return self ; } - (void )cofigureWithCashType:(HCDCashType)type { switch (type) { case HCDCashTypeNormal: { self .cash = [[HCDCashNormal alloc] init]; } break ; case HCDCashTypeRobate: { self .cash = [[HCDCashRobate alloc] initWithMoneyRebate:0.8 ]; } break ; case HCDCashTypeReturn: { self .cash = [[HCDCaseReturn alloc] initWithMoneyReturn:5 ]; } break ; } } - (CGFloat )getResult:(CGFloat )money { return [self .cash acceptCash:money]; } @end
1 2 3 4 5 6 @protocol HCDCashProtocol <NSObject >- (CGFloat )acceptCash:(CGFloat )cash; @end
1 2 3 4 5 6 7 8 9 10 11 12 13 14 15 16 17 18 19 20 21 22 23 24 25 26 27 28 29 30 31 32 33 @interface HCDCaseReturn : NSObject <HCDCashProtocol >-(instancetype )initWithMoneyReturn:(CGFloat )moneyReturn; @end @interface HCDCaseReturn ()@property (nonatomic , assign )CGFloat moneyReturn;@end @implementation HCDCaseReturn #pragma mark - life cycle -(instancetype )initWithMoneyReturn:(CGFloat )moneyReturn{ self = [super init]; if (self ) { _moneyReturn = moneyReturn; } return self ; } #pragma mark - HCDCashProtocol -(CGFloat )acceptCash:(CGFloat )cash{ return cash - self .moneyReturn; } @end
1 2 3 4 5 6 7 8 @implementation HCDCashNormal -(CGFloat )acceptCash:(CGFloat )cash{ return cash; } @end
1 2 3 4 5 6 7 8 9 10 11 12 13 14 15 16 17 18 19 20 21 22 23 24 25 26 27 28 29 @interface HCDCashRobate : NSObject <HCDCashProtocol >-(instancetype )initWithMoneyRebate:(CGFloat )moneyRebate; @end @interface HCDCashRobate ()@property (nonatomic , assign ) CGFloat moneyRebate;@end @implementation HCDCashRobate -(instancetype )initWithMoneyRebate:(CGFloat )moneyRebate{ self = [super init]; if (self ) { _moneyRebate = moneyRebate; } return self ; } -(CGFloat )acceptCash:(CGFloat )cash{ return self .moneyRebate * cash; } @end
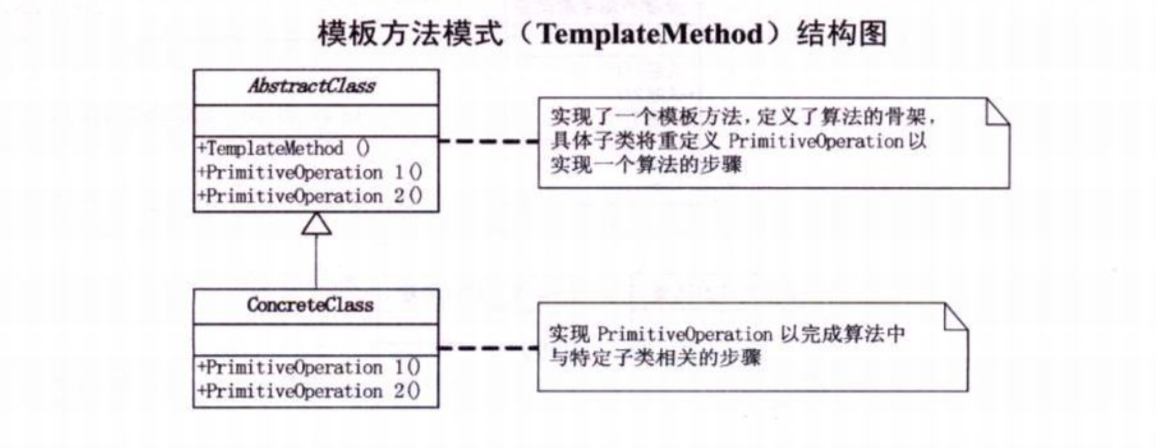
模板方法模式 模式动机 模板方法模式是基于继承的代码复用基本技术,模板方法模式的结构和用法也是面向对象设计的核心之一。
模式定义 定义一个操作中的算法的骨架,而将一些步骤延迟到子类中。模板方法使得子类可以不改变一个算法的结构即可重定义该算法的某些特定步骤。
模式结构 模板方法模式包含如下角色:
AbstractClass: 抽象类
ConcreteClass: 具体子类
时序图 略
源码 1 2 3 4 5 6 7 8 HCDtextPaper *paperA = [[HCDtextPaperA alloc]init]; [paperA testQuestion1]; [paperA testQuestion2]; HCDtextPaper *paperB = [[HCDtextPaperB alloc]init]; [paperB testQuestion1]; [paperB testQuestion2];
1 2 3 4 5 6 7 8 9 10 11 12 13 14 15 16 17 18 19 20 21 22 @interface HCDtextPaper : NSObject - (void )testQuestion1; - (void )testQuestion2; - (NSString *)answer1; - (NSString *)answer2; @end
1 2 3 4 5 6 7 8 9 10 11 12 13 14 15 16 17 18 19 20 21 22 @implementation HCDtextPaper -(void )testQuestion1 { NSLog (@"问题:杨过得到,后来给了郭靖,炼成倚天剑、屠龙刀的玄铁可能是[ ]:a.球磨铸铁 b.马口铁 c.高速合金钢 d.碳素纤维" ); NSLog (@"答案:%@" , [self answer1]); } -(NSString *)answer1 { return @"" ; } -(void )testQuestion2 { NSLog (@"问题:杨过、程英、陆无双铲除了情花,造成[ ]:a.使这种植物不再害人 b.使一种珍稀物种灭绝 c.破坏了那个生物圈的生态平衡 d.造成该地区沙漠化" ); NSLog (@"答案:%@" , [self answer2]); } -(NSString *)answer2{ return @"" ; } @end
1 2 3 4 5 6 7 8 9 10 11 12 @implementation HCDtextPaperA -(NSString *)answer1{ return @"b" ; } -(NSString *)answer2{ return @"c" ; } @end
1 2 3 4 5 6 7 8 9 10 11 12 @implementation HCDtextPaperB -(NSString *)answer1{ return @"a" ; } -(NSString *)answer2{ return @"d" ; } @end
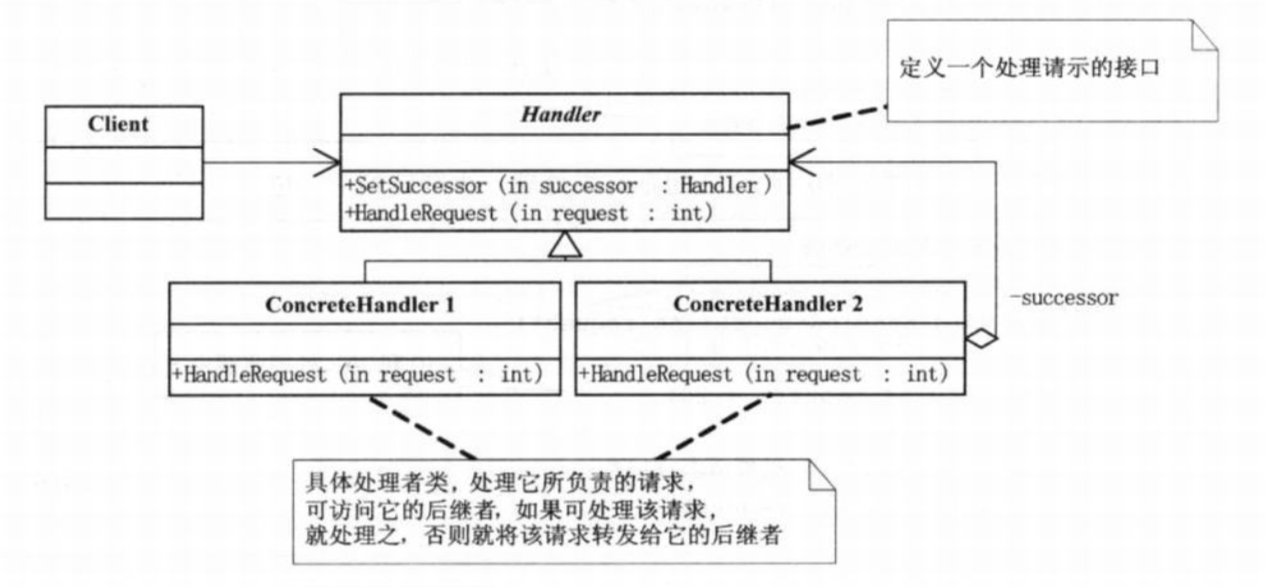
职责链模式 模式动机 很多情况下,在一个软件系统中可以处理某个请求的对象不止一个。例如采购审批子系统,主任、副董事长、董事长和董事会都可以处理采购单,他们可以构成一条处理采购单的链式结构,采购单(可以看作是要处理的信息)沿着这条链进行传递,这条链就称为责任链。责任链可以是一条直线、一个环或者一个树形结构,最常见的职责链是直线型,即沿着一条单向的链来传递请求,如下图所示。链上的每一个对象都是请求处理者,责任链模式可以将请求的处理者组织成一条链,并让请求沿着链传递,由链上的处理者对请求进行相应的处理。在此过程中,客户端实际上无须关心请求的处理细节以及请求的传递,只需将请求发送到链上即可,从而实现请求发送者和请求处理者解耦。
模式定义 使多个对象都有机会处理请求,从而避免请求的发送者和接受者之间的耦合关系。将这个对象连成一条链,并沿着这条链传递该请求,直到有一个对象处理它为止。
模式结构 职责链模式包含如下角色:
Handler: 处理者抽象类
ConcreteAggregate: 具体处理者类
时序图 略
源码 1 2 3 4 5 6 7 8 9 10 11 12 13 14 15 16 17 18 19 20 21 22 23 24 25 26 27 28 29 30 HCDCommonManager *jinli = [[HCDCommonManager alloc]initWithName:@"经理" ]; HCDMajorManager *zongjian = [[HCDMajorManager alloc]initWithName:@"总监" ]; HCDGenaralManager *zongjinli = [[HCDGenaralManager alloc]initWithName:@"总经理" ]; jinli.superior = zongjian; zongjian.superior = zongjinli; HCDReuquest *request = [[HCDReuquest alloc] init]; request.requestType = @"请假" ; request.requestContent = @"小菜请假" ; request.number = 1 ; [jinli dealRequest:request]; HCDReuquest *request1 = [[HCDReuquest alloc] init]; request1.requestType = @"请假" ; request1.requestContent = @"小菜请假" ; request1.number = 4 ; [jinli dealRequest:request1]; HCDReuquest *request2 = [[HCDReuquest alloc] init]; request2.requestType = @"加薪" ; request2.requestContent = @"小菜请求加薪" ; request2.number = 500 ; [jinli dealRequest:request2]; HCDReuquest *request4 = [[HCDReuquest alloc] init]; request4.requestType = @"加薪" ; request4.requestContent = @"小菜请求加薪" ; request4.number = 1000 ; [jinli dealRequest:request4];
1 2 3 4 5 6 7 8 9 10 11 12 13 @class HCDReuquest ;@interface HCDMnager : NSObject @property (nonatomic , copy ) NSString *name;@property (nonatomic , strong ) HCDMnager *superior;- (instancetype )initWithName:(NSString *)name; - (void )dealRequest:(HCDReuquest *)request; @end
1 2 3 4 5 6 7 8 9 10 11 12 13 14 15 16 17 18 19 @interface HCDCommonManager : HCDMnager @end @implementation HCDCommonManager - (void )dealRequest:(HCDReuquest *)request{ if ([request.requestType isEqualToString:@"请假" ] && request.number <= 2 ) { NSLog (@"%@:%@ 数量%ld 被批准" ,self .name,request.requestType,request.number); }else { if (self .superior) { [self .superior dealRequest:request]; } } } @end
1 2 3 4 5 6 7 8 9 10 11 12 13 14 15 16 17 18 @interface HCDMajorManager : HCDMnager @end @implementation HCDMajorManager -(void )dealRequest:(HCDReuquest *)request{ if ([request.requestType isEqualToString:@"请假" ] && request.number <= 5 ) { NSLog (@"%@:%@ 数量%ld 被批准" ,self .name,request.requestType,request.number); }else { if (self .superior) { [self .superior dealRequest:request]; } } } @end
1 2 3 4 5 6 7 8 9 10 11 12 13 14 15 16 17 18 19 20 21 22 23 @interface HCDGenaralManager : HCDMnager @end @implementation HCDGenaralManager -(void )dealRequest:(HCDReuquest *)request{ if ([request.requestType isEqualToString:@"请假" ]) { NSLog (@"%@:%@ 数量%ld 被批准" ,self .name,request.requestType,request.number); } else if ([request.requestType isEqualToString:@"加薪" ]){ if (request.number <= 500 ) { NSLog (@"%@:%@ 数量%ld 被批准" ,self .name,request.requestType,request.number); } else { NSLog (@"%@:%@ 数量%ld 再说吧" ,self .name,request.requestType,request.number); } } else { } } @end
1 2 3 4 5 6 7 8 9 10 11 12 13 14 15 16 17 18 19 @interface HCDReuquest : NSObject @property (nonatomic , copy ) NSString *requestType;@property (nonatomic , copy ) NSString *requestContent;@property (nonatomic , assign ) NSInteger number;@end
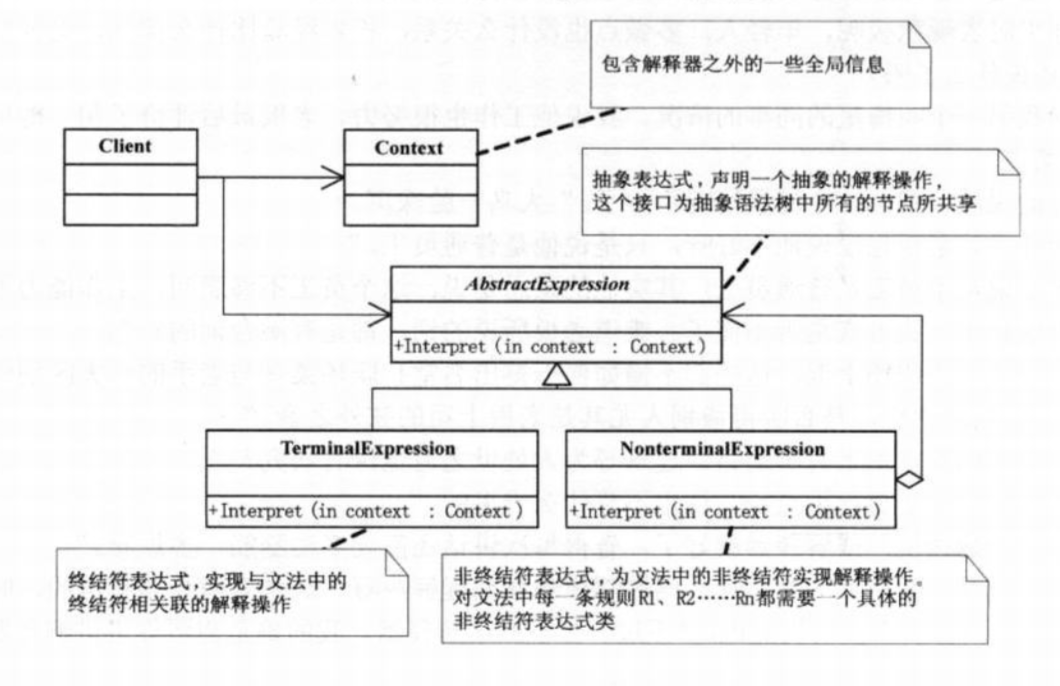
解释器模式 模式动机 如果在系统中某一特定类型的问题发生的频率很高,此时可以考虑将这些问题的实例表述为一个语言中的句子,因此可以构建一个解释器,该解释器通过解释这些句子来解决这些问题。
模式定义 给定一种语言,定义它的文法的一种表示,并定义一个解释器,这个解释器使用该表示来解释语言中的句子。
模式结构 解释器模式模式包含如下角色:
AbstractExpression: 抽象表达式
TerminalExpression: 终结符表达式
NonterminalExpression: 非终结符表达式
Context: 环境类
Client: 客户类
时序图 略
源码 略
访问者模式 模式动机 访问者模式的目的是封装一些施加于某种数据结构元素之上的操作,一旦这些操作需要修改的话,接受这个操作的数据结构可以保持不变。为不同类型的元素提供多种访问操作方式,且可以在不修改原有系统的情况下增加新的操作方式,这就是访问者模式的模式动机。
模式定义 表示一个作用于某对象结构中的各元素的操作。它使你可以在不改变各元素的类的前提下定义作用于这些元素的新操作。
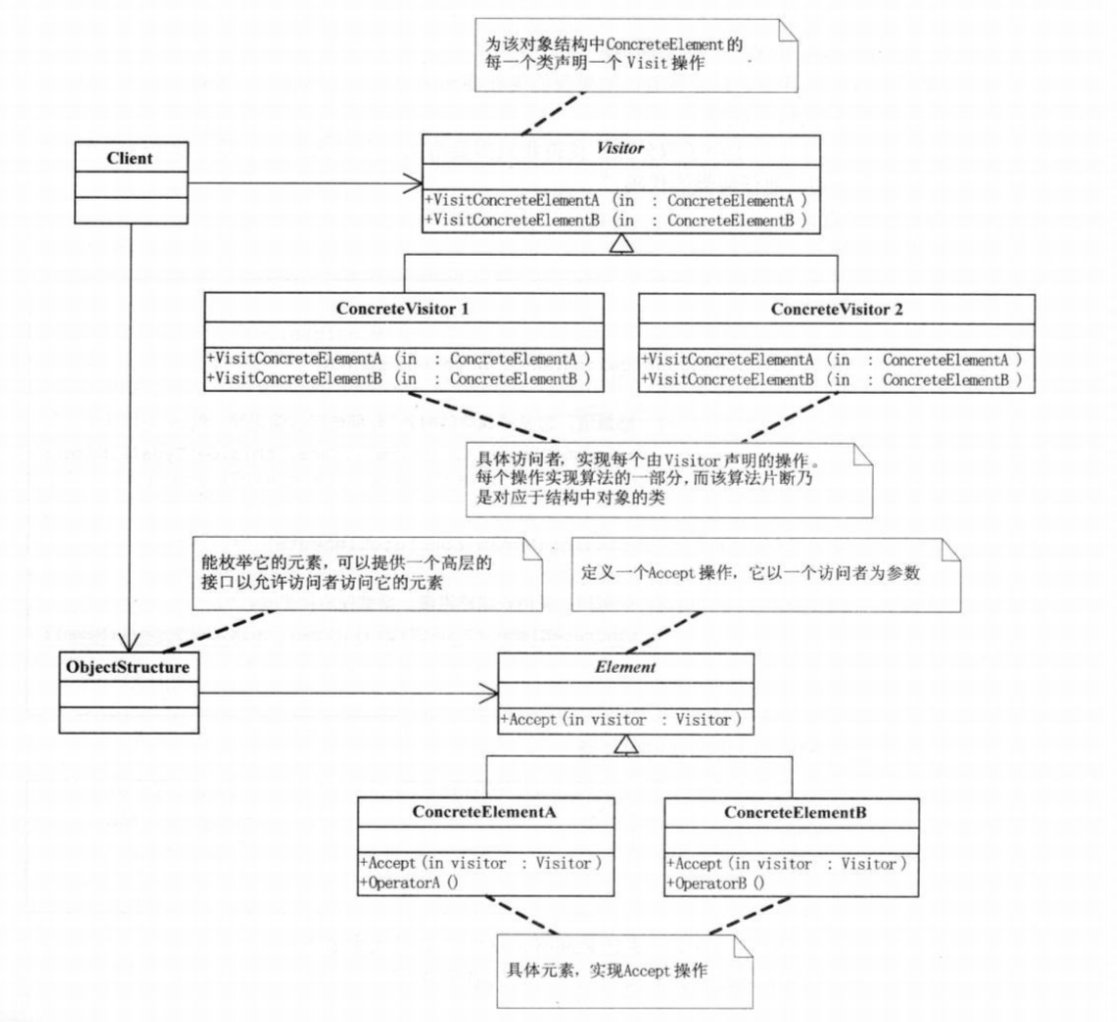
模式结构 访问者模式包含如下角色:
Vistor: 抽象访问者。为该对象结构中的ConcreteElement的每一个类声明的一个操作。
ConcreteVisitor: 具体访问者。实现Visitor申明的每一个操作,每一个操作实现算法的一部分。
Element: 抽象元素。定义一个Accept操作,它以一个访问者为参数。
ConcreteElement: 具体元素 。实现Accept操作。
ObjectStructure: 对象结构。能够枚举它的元素,可以提供一个高层的接口来允许访问者访问它的元素。
时序图 略
源码 1 2 3 4 5 6 7 8 9 10 11 12 13 14 15 16 17 18 HCDObjectStructure *o = [[HCDObjectStructure alloc]init]; HCDConcreteElementA *eA = [HCDConcreteElementA new]; HCDConcreteElementB *eB = [HCDConcreteElementB new]; [o attach:eA]; [o attach:eB]; HCDConcreteVisitor1 *v1 = [HCDConcreteVisitor1 new]; HCDConcreteVisitor2 *v2 = [HCDConcreteVisitor2 new]; [o accept:v1]; NSLog (@"================================" );[o accept:v2];
1 2 3 4 5 6 7 8 9 10 11 12 13 @class HCDElements ;@class HCDVisitors ;@interface HCDObjectStructure : NSObject -(void )attach:(HCDElements *)element; -(void )detach:(HCDElements *)element; -(void )accept:(HCDVisitors *)visitor; @end
1 2 3 4 5 6 7 8 9 10 11 12 13 14 15 16 17 18 19 20 21 22 23 24 25 26 27 28 29 30 31 32 @interface HCDObjectStructure ()@property (nonatomic , strong ) NSMutableArray *elements;@end @implementation HCDObjectStructure -(instancetype )init{ self = [super init]; if (self ) { _elements = [[NSMutableArray alloc]init]; } return self ; } -(void )attach:(HCDElements *)element{ [self .elements addObject:element]; } -(void )detach:(HCDElements *)element{ [self .elements removeObject:element]; } -(void )accept:(HCDVisitors *)visitor{ for (HCDElements *e in self .elements) { [e accept:visitor]; } } @end
1 2 3 4 5 6 7 8 9 10 11 12 13 14 15 16 17 18 19 20 21 22 23 24 25 26 27 28 29 30 31 32 33 34 35 36 37 38 39 40 41 42 43 44 @interface HCDVisitors : NSObject -(void )visitConcreteElementA:(HCDConcreteElementA *)concreteElementA; -(void )visitConcreteElementB:(HCDConcreteElementB *)concreteElementB; @end @interface HCDConcreteVisitor1 : HCDVisitors @end @implementation HCDConcreteVisitor1 -(void )visitConcreteElementA:(HCDConcreteElementA *)concreteElementA{ NSLog (@"男人接收到喜这个visitor============我要飞" ); } -(void )visitConcreteElementB:(HCDConcreteElementB *)concreteElementB{ NSLog (@"女人接收到喜这个visitor============我要跳" ); } @end @interface HCDConcreteVisitor2 : HCDVisitors @end @implementation HCDConcreteVisitor2 -(void )visitConcreteElementA:(HCDConcreteElementA *)concreteElementA{ NSLog (@"男人接收到怒这个visitor============我要叫" ); } -(void )visitConcreteElementB:(HCDConcreteElementB *)concreteElementB{ NSLog (@"女人接收到怒这个visitor============我要苦" ); } @end
1 2 3 4 5 6 7 @class HCDVisitors ;@interface HCDElements : NSObject -(void )accept:(HCDVisitors *)visitor; @end
1 2 3 4 5 6 7 8 9 10 11 12 @implementation HCDConcreteElementA -(void )operationA{ return ; } -(void )accept:(HCDVisitors *)visitor{ [visitor visitConcreteElementA:self ]; } @end
1 2 3 4 5 6 7 8 9 10 11 12 @implementation HCDConcreteElementB -(void )operationB{ return ; } -(void )accept:(HCDVisitors *)visitor{ [visitor visitConcreteElementB:self ]; } @end
小结 在实际的项目开发过程中,使用某些特定的设计模式能够很好的解决问题。同时,在维护他人编写的代码时,如果对设计模式特别熟悉,遇到时也比较容易定位问题。这里 Graphic Design Patterns